Categories
Recipes

Gorgeous Easy No-Bake Oreo Blackberry Mousse Tart

Oh my look at you, You’re Gorgeous!!!

I’ve never seen a tart like you before…

There have been many before but you take the cake…see what I did there. 😉

SOOOOO Gorgeous! The No-Bake Oreo Blackberry Mousse Tart posing for the camera.

The Oreo Blackberry Mousse Tart is decorated with blackberries and blueberries and topped with some flowers. The dark cookie base makes the colours pop!


OREO BASE

Estimated time to create the base: 30 minutes (including 15 minutes in the freezer to set the base).

The Oreo Cookies ready for the cookie base

BLACKBERRY MOUSSE

Estimated time to create the mousse: Around 20 to 30 minutes.

  • 225 grams of blackberries – I purchased 3 punnets to have enough to decorate the tart
  • 2 punnets of blueberries to decorate the tart
  • 225 grams of Philadelphia Original Cream Cheese
  • 75 grams of caster sugar
  • 2 teaspoons of vanilla extract
  • 300ml of thickened cream
  • 60ml of milk
  • 6 sheets of natural gelatine leaves
Yummy and fresh blackberries from Todarello’s in Katoomba

I’ve been diving deep into the world of online recipes and let me tell you, it’s a riot of colours out there! From jaw-dropping cakes to slices that are more vibrant than a Taylor Swift song, and even pasta sporting hues that would make a rainbow jealous, cooks are truly artists in their own right. Recently, I stumbled upon this Oreo Cookie-based tart, and oh boy, that dark crust was the superstar alongside the dazzling colours of raspberry and blueberry—totally spoke to my taste buds!

Now, here’s the kicker—it’s a no-bake wonder! Yup, just pop it in the fridge and freezer, and voila! I’m all about saving time in the kitchen, so this dessert is right up my alley.

For my twist, I’m thinking of infusing the mousse with blackberries. Yep, blackberries! This recipe has got me all excited about trying something totally new in my culinary playbook.

And speaking of summer, it’s the season when blackberries and blueberries shine bright like my love for a catchy summer tune (Swiftie alert!). As someone who lives and breathes summer berries (hello, favourite season!), knowing they’re in season makes me gleeful. It’s like a shortcut to creating a tart bursting with the freshest summer berries—a total win-win situation!

Did you know?

Blackberries are the tiny, mighty warriors of goodness! These delightful berries bring a whole parade of perks to the party. Here’s a sneak peek into the fantastic world of benefits that these little black gems bring along:

  • High in vitamin C
  • High in fibre
  • Can help reduce cholesterol
  • Manage blood sugar levels by slowing the rate of sugar absorption
  • A good source of vitamin K
  • High in manganese
  • May improve brain health
  • Also supports oral health

As you can see not only do blackberries and blueberries look pretty, they are delicious
and very good for you.

Blueberries are like the rockstars of superfoods! These little powerhouses are bursting with goodness, and their list of amazing deeds is simply off the charts. Check out below all the fantastic things these tiny but mighty blue dynamos can do:

  • High in antioxidants
  • Protect against DNA damage, which may help protect against aging and cancer
  • Blueberries help prevent oxidative damage to “bad” LDL cholesterol
  • Help prevent heart disease
  • Help your brain and memory
  • Blueberries have been shown to have anti-diabetes effects
  • Help with inflammation after exercise

Do you need more of a reason to have a
second helping of the No-Bake Oreo
Blackberry Mousse Tart?

For my fresh produce, I like to shop locally at Todarello’s Katoomba Village Fruit Market.

I can’t get enough of Todarello’s! Their produce selection is seriously impressive—I mean, it’s like a treasure trove every time I walk in. But you know what really seals the deal? The people there are just amazing. They’re like your own personal shopping squad, always there to lend a hand and make your grocery trip a breeze. No question is too much trouble, and they’re more than happy to help carry your bags to the car. They’re the real MVPs (Most Valuable Player) of the grocery store, making the whole experience a whole lot easier!

Stepping into Todarello’s Katoomba is like entering a vibrant wonderland for your senses! The explosion of colours from fresh fruits and vegetables is an absolute feast for the eyes. Every corner boasts a stunning array of produce, each piece seemingly competing to be the most tempting. And you know what? It’s not just about the looks—every single item on display here is top-notch. It’s a guarantee that when you pick something up, you’re getting the absolute best, freshest ingredients available. It’s like having a palette of nature’s finest at your fingertips.


During my visit to Todarello’s Katoomba Village Fruit Market, I purchased three punnets of luscious blackberries and two punnets of tantalizing blueberries—all set and primed for my upcoming no-bake tart adventure!

This tart might seem like a tough nut to crack, but let me tell you, it’s a breeze! Creating this masterpiece is an absolute cinch—effortless and oh-so-fun!

How do you make this gorgeous dessert?

Download the recipe card

GORGEOUS EASY NO-BAKE OREO BLACKBERRY MOUSSE TART

    We respect your privacy. Unsubscribe at any time.

    METHOD

    Step 1: Create the Oreo base. You will need a blender to turn the Oreo Cookies into powder. Unwrap all three packets to give you 33 cookies and add them to the blender. Once all the cookies have been cut up and resemble dirt, add the melted butter to the Oreo mixture. This will form a dough to create the crust for the tart.

    Step 2: Add the Oreo dough to the tart pan (make sure to have a tart pan with a removable bottom). Press the Oreo dough into the tart pan to cover all the bottom and the sides of the tart.

    Step 3: Once the dough is all spread out into the tart pan, put it in the freezer for 15 minutes. Don’t leave for longer than 15 minutes. After 15 minutes put the tart pan in the fridge so that you can work on the blackberry mousse filling.

    Step 4: Creating the blackberry mousse. Add blackberries into the blender until they are pureed, then add the cream cheese, sugar and vanilla essence until it is a smooth consistency. You might need to stop the blender and stir some ingredients around to ensure all is mixed correctly and there are no lumps.

    Step 5: Whip the cream until firm in a separate bowl.

    Step 6: Hydrate the gelatin sheets.

    Step 7: Heat milk in the microwave but not to boiling (needs to be hot). Make sure to drain the gelatin sheets and then add them to the hot milk and stir until they have dissolved into the milk.

    Step 8: Add the milk to the blackberry puree and mix until all is combined well.

    Step 9: Pour into the bowl with the whipped cream and carefully mix well folding over slowly to mix using enveloping movements.

    Step 10: Pour the blackberry mouse into the tart pan and smooth out the mixture to make sure it sets with no lumps or bumps on the top of the tart.

    Step 11: Refrigerate the tart for at least 4 hours (preferably overnight) to set.

    The stunningly gorgeous No-Bake Oreo Blackberry Mousse Tart cut and ready to eat!


    Once the mousse is set you can safely remove the tart from the pan. If you have some difficulty removing your tart from the pan The Cozy Plum has a great instructional video that might help.

    YUMMY! It looks so fantastic…Don’t you just want a slice?


    Decorate with: Blackberries, blueberries, nuts, dark chocolate, raspberries or whatever takes your fancy. Serve with fresh cream or ice cream.

    Enjoy this gorgeous treat!

    Admiring the dark Oreo cookie base of the blackberry mousse tart.

    POST FEAST REVIEW

    I was seriously blown away by how ridiculously easy this tart was to whip up! I mean, no cooking at all—just some fridge and freezer magic, and bam! Talk about a turbo-speed dessert! And the taste? Oh, boy, let me tell you—it was a mouthful of pure creamy goodness with that punchy blackberry zing. But guess what? Not only did it taste like a dream, but it also looked like a showstopper! Seriously, it’s a double win when delicious meets stunning!

    The added blackberries, blueberries and flowers make this no-bake tart look magical.

    WOULD I MAKE THIS AGAIN?

    Oh, heck yes! This tart was an absolute flavour bomb and a sight for sore eyes! But you know what? I’m already brainstorming some wild ideas for the next round. Picture this: a funky dance of colours in the mousse—maybe a raspberry rave or a mixed berry bash with blackberries and blueberries. I’m aiming for this majestic deep purple hue in the mousse that’ll pop against the rich, dark Oreo cookie base. Talk about a visual treat!

    And hey, why stick to one big tart when you can have a squad of mini-tarts, right? I’m thinking of snagging some individual tart pans for these bite-sized delights. They’re perfect for those quick, “I-deserve-a-treat” moments.

    But wait, the party doesn’t stop there! I’m on a mission to jazz up the decorations too. Picture this: a canvas of melted dark chocolate creating artsy lines, topped with a crunchy medley of roasted nuts—pistachios, almonds, and maybe a sprinkle of other berries for that extra pizzazz. Get ready, taste buds, because we’re about to take this tart game to a whole new level.

    Sign up for my newsletter

    Don’t miss a thing by signing up for my newsletter. This newsletter will list all giveaways and fabulous things that are happening. Stay current with all the things that are happening on Mummy to Twins Plus One.


    This post has affiliate links

    Originally published on December 30, 2023

    Categories
    Beauty

    DIY Pumpkin Beauty Products

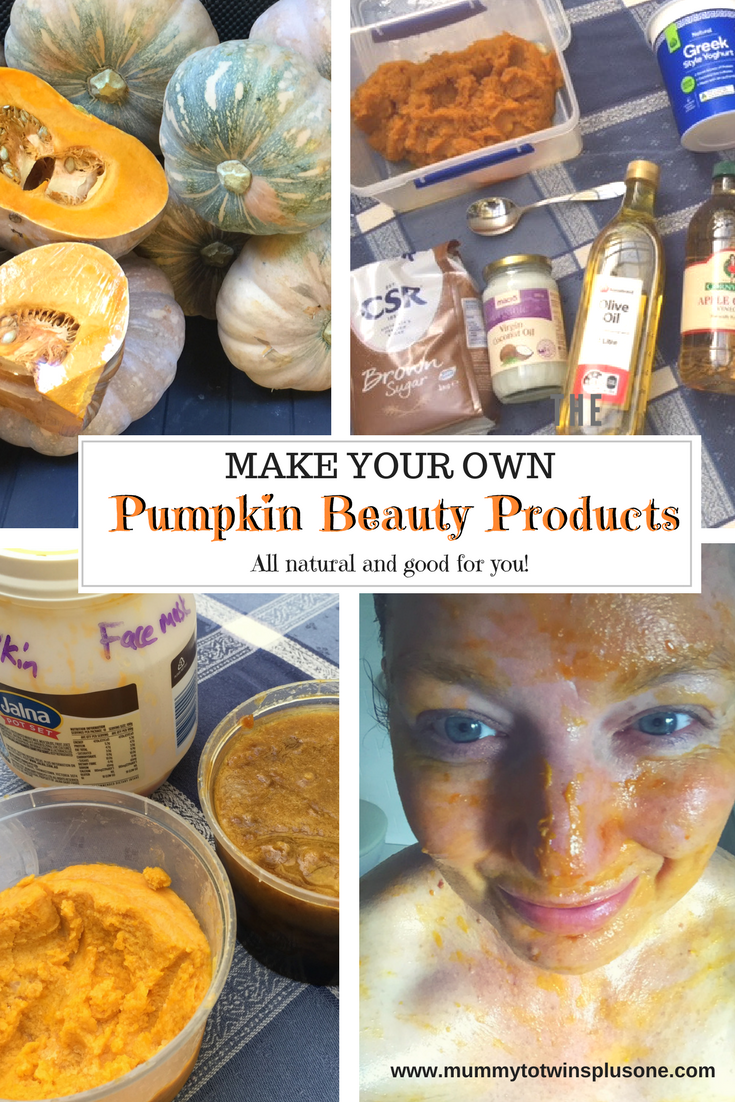
    Have you ever wondered how easy it is to create your own natural beauty products? How about making pumpkin beauty products?

    I know I have and thought it would be hard, in fact it is super easy and fun. However, it can get a bit messy, so take care.

    Autumn is here, and cooler weather means hearty food; Stews, casseroles, roast meat with vegetables and more.

    Pumpkin is one of my favourites. What about you?

    Some things I love to make with pumpkin are mash, roast pumpkin and pumpkin chips with a little bit of cheese melted over them. What is your favourite pumpkin dish?

    Pumpkin all cut up and ready to be turned into mash.
    Pumpkin all cut up and ready to be turned into mash.

    I stocked up on pumpkins from my local greengrocer, The Veggie Patch at Blackheath.  Getting your fruit and veg from a local greengrocer is great.

    Look at all these yummy pumpkins. Perfect for dinner and then to make some healthy and natural beauty products.
    Look at all these yummy pumpkins. Perfect for dinner and then to make some healthy and natural beauty products.

    The best place for fresh fruit and vegetables at Blackheath, The Veggie Patch.
    The best place for fresh fruit and vegetables at Blackheath, The Veggie Patch.

    The Veggie Patch at Blackheath
    The Veggie Patch at Blackheath

    The idea of using the left over pumpkin mash means that my body is getting the vitamins on the skin, it is all natural, there is less waste, it is good for me.

    “Healthy food inside and healthy natural products outside”

    How to make Pumpkin Mash?

    Firstly, you need to cut up your pumpkin into smaller chunks. Making all the pumpkin into similar sizes means that it will be cooked quickly, and all the pumpkin will cook at the same rate.

    Once all done put a cup or two of water into a saucepan and boil the water. Once boiling add the pumpkin and leave on the stove until it is all soft and ready to be mashed up.

    If you are using the mash for eating you generally add some milk and butter, plus you could add other items to the mash, for example onions, and crushed up almonds or pumpkin seeds.

    If you are using the pumpkin mash for beauty products, then just mash it up and put it in a sealed container until you are ready to create your own handmade works of beauty.

    The pumpkin is all cooked and now ready to mash up to be mash!
    The pumpkin is all cooked and now ready to mash up to be mash!

    What are the health benefits of pumpkin?

    • Great source of fibre
    • High in beta-carotene
    • May help with reducing diabetes, heart disease, and some cancers and also help delay ageing and body degeneration.
    • Pumpkins also have calcium, magnesium and some B vitamins.
    • Beta-carotene helps boost the immune system.
    • Pumpkins are high in antioxidants – Vitamin C, and Vitamin E.

    Testing out the Pumpkin Body Butter. It is so wonderful on my skin and leaves it so smooth.
    Testing out the Pumpkin Body Butter. It is so wonderful on my skin and leaves it so smooth.

    Why is it good for your skin?

    Pumpkins are a great source of Vitamin A and Vitamin C. These helpful vitamins help soften skin while improving any damaged cells. What a powerful vegetable is the pumpkin!

    What did I use to create my pumpkin beauty products?

    All the items I needed for my homemade pumpkin beauty products. Some were good enough to eat!
    All the items I needed for my homemade pumpkin beauty products. Some were good enough to eat!

    • Mashed Pumpkin
    • Brown Sugar
    • Coconut Oil
    • Olive Oil
    • Yoghurt
    • 1 egg
    • The Apple Cider Vinegar was for the Pumpkin Face Mask for oily skin, but I didn’t make this one. Read on to see the recipe for this face mask as well.
    • Honey
    • Measuring cups
    • Spoons
    • Containers to store the products in

    Make sure to refrigerate your items after you make them. They are made with real vegetables and therefore will perish if not kept well. Use quickly and enjoy!

    Testing out my pumpkin hair conditioner, it made my hair feel very soft afterwards.
    Testing out my pumpkin hair conditioner, made my hair feel very soft afterwards.

    What pumpkin beauty products did I make?

    I’ve created a sheet so that you can have all the info in one spot, download all the pumpkin beauty recipes in one PDF printable.

    • Pumpkin Body Sugar Scrub
      Mix 1 cup of pumpkin mash with 1 cup of sugar. Add a tablespoon of olive oil and mix together until you make a paste.

      Making the Pumpkin Body Sugar Scrub
      Making the Pumpkin Body Sugar Scrub
    • Pumpkin Body Butter
      Mix 1 cup of pumpkin mash with 1 cup of coconut oil. You can make a smaller batch, but if you are like me you will love this and so will your skin.
      I ended up putting the mixture in my blender to get all the lumps of the coconut oil out. Smother over your skin during a shower.

      The Pumpkin Body Butter is my favourite product.

      Mixing up the ingredients for the Pumpkin Body Butter. It is sooooooooo good!
      Mixing up the ingredients for the Pumpkin Body Butter. It is so good!

      My skin gets so dry during Autumn and Winter, the cooler air zaps the moisture from my skin and means I need to be vigilant with the body moisturiser.

    • Pumpkin Face Mask for Dry Skin
      Mix 1/4 cup of pumpkin with 1 teaspoon of olive oil, 1 teaspoon of honey and 1 whole egg. Mix until all smooth, then you test it out. I left it on for 20 minutes.

      Trying out my new Pumpkin Face Mask for Dry Skin
      Trying out my new Pumpkin Face Mask for Dry Skin
    • Pumpkin Sugar Lip Scrub
      Mix 1 teaspoon or 1/4 teaspoon of pumpkin mash with a 1/4 teaspoon of olive oil (or you could use coconut oil), and add 1 teaspoon or half a teaspoon of fine sugar (I used brown sugar).
      Mix all ingredients together, and then rub on lips to exfoliate.

      The brown sugar I used in the pumpkin beauty products. Adding this made the Pumpkin Sugar Lip Scrub smell amazing!
      The brown sugar I used in the pumpkin beauty products. Adding a little bit of this made the Pumpkin Sugar Lip Scrub smell amazing!
    • Pumpkin Hair Conditioner
      Mix 1 cup pumpkin mash and 1 cup of yoghurt, plus a teaspoon of honey.  I couldn’t help myself as this mixture smelt amazing I had to have a taste, and it was so yummy!
      What other hair conditioner could you eat as well?
      Leave for 30 minutes. Have a shower afterwards to make sure it is all washed out.

      The Pumpkin Hair Conditioner is complete and ready to use.
      The Pumpkin Hair Conditioner is complete and ready to use.

      The The Pumpkin Hair Conditioner smelt so yummy I had to have a taste, and yes it was wonderful!
      The The Pumpkin Hair Conditioner smelt so yummy I had to have a taste, and yes it was wonderful!

    I didn’t make the below pumpkin face mask. My skin is rather dry, so I wanted a mask that will help my skin feel more hydrated.

    • Pumpkin Face Mask for Oily Skin
      Here is the breakdown of how to make this other pumpkin face mask:
      Mix 1/4 cup of mashed pumpkin with 1 whole egg, add 1 tablespoon of Apple Cider Vinegar and mix together. Leave on for 20 minutes then wash off.

    All pumpkin beauty products that I made. The one in the big bowl is the pumpkin face mask for dry skin, I was about to put it into my recycled yoghurt container.
    All pumpkin beauty products that I made. The one in the big bowl is the pumpkin face mask for dry skin, I was about to put it into my recycled yoghurt container.

    What else can you make with pumpkins?

    For the body: Soap, foot scrub, and other face masks.

    To eat: Cakes, soups, pumpkin butter, pies, drinks, bake the seeds to eat later, muffins, smoothies, add to your breakfast cereal (oats), use the mash as baby food or addition in meals to help kids eat more veggies.

    For fun: Halloween lanterns and bowls for a dip at parties.

    I hope this post gives you some inspiration to make your own cheap pumpkin beauty products.

    Sign up for my newsletter

    Stay current with all the things that are happening on Mummy to Twins Plus One. Don’t miss a thing by signing up for my newsletter. This newsletter will list all giveaways and fabulous things that are happening.

    Originally published April 14 2018

    Categories
    News

    Thrilled to Be a Finalist for the 2024 Fresh Content Award!

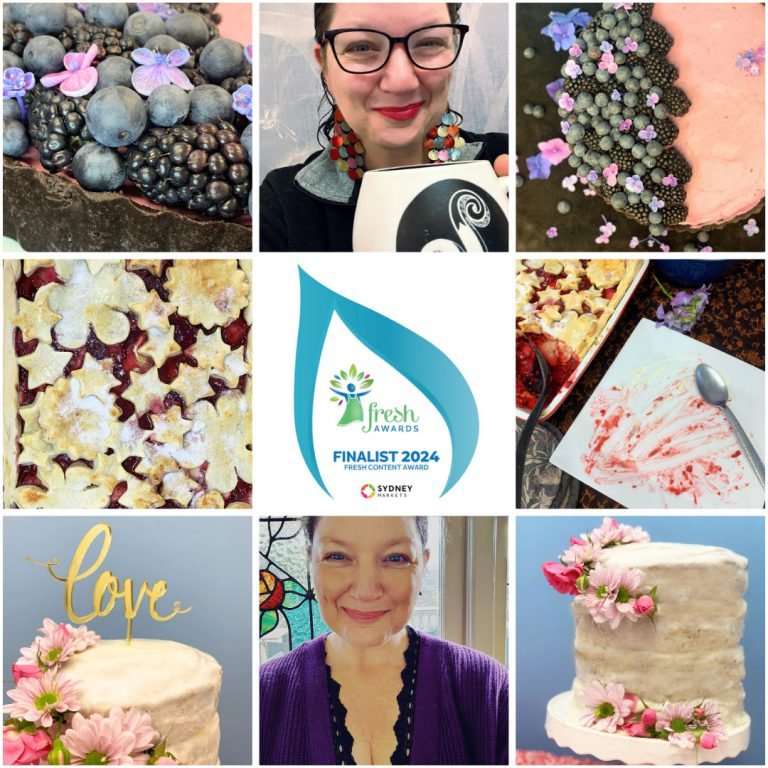
    Hey there, wonderful readers!

    I have some exciting news to share—I’m a finalist for the 2024 Fresh Content Award! 🎉 This is my third time being nominated, and I couldn’t be more thrilled. The excitement is even sweeter this year because my twin girls will be by my side to celebrate this special night.

    Meet the other Finalists

    I’m in great company with these amazing creators:

    Gorgeous Easy No-Bake Oreo Blackberry Mousse Tart

    As mentioned before, I was lucky enough to be a finalist two years in a row (a major highlight for me!). Check out my upcoming posts to see what I entered and read about my never-ending quest for the perfect outfit:

    The stunning Easy No-Bake Oreo Blackberry Mousse Tart is a sight to behold, with its rich Oreo base complemented by the vibrant blackberry mousse and delicate flowers.

    The Fresh Awards Gala Night is just one week away, and I can’t wait to don my stunning outfit—finally found thanks to Temu (who would have thought!)—and join my fellow finalists for an evening of celebration and recognition. Knowing that my daughters will be there cheering me on makes this moment all the more magical.

    I’ve spent what feels like an eternity hunting down the perfect outfit. The mad dash from shop to shop, trying on duds that made me look like a fashion disaster, was beyond exhausting. I’m sure you’ve been there too! It really fried my brain and zapped some of the fun out of the event prep. But hey, I finally found a great outfit (I think so, and that’s what counts), and now I’m getting excited about the occasion again!

    My latest online order—it’s a total winner! Everything looks absolutely fantastic.
    Image sourced from boredpanda.com.

    Celebrating Passion and Creativity

    Being a finalist for the third time is incredibly exciting! It showcases the dedication and creativity I pour into each post. Being recognised for my hard work is truly gratifying. I love celebrating fresh produce and flowers and sharing that joy with you all through my blog and social media brings me immense happiness! 🌸🍇

    My amazing wedding cakeover was affordable and easy to create, adorned with fresh flowers from Fine Flowers Katoomba.
    Adding a different top to a crumble creates interest – this Pretty Pastry Apple and Rhubarb Crumble looks great with the different flower-type pastry shapes.

    I love playing with ingredients, finding clever ways to make dinner parties or gatherings a breeze, and whipping up tasty treats for everyone to savour and share!

    I had a blast creating these for my 2024 Fresh Awards entries:

    The girls and I are gearing up for a fun day in the city, prepping for the big event and soaking in all the excitement. We’ll be dressed to impress in our cocktail finest, ready to savour the night with the other finalists and celebrate our shared love for deliciously fresh content.

    It’s going to be a treat sharing this event with my girls, giving them a taste of what it’s like to attend an awards night and showing them that hard work is the secret ingredient to being in such fabulous company with all the other finalists.

    Wishing Everyone the Best of Luck

    Sending my best wishes to my fellow finalists—Vincent, Lorraine, and Katie. It’s a true honour to be among such talented creators, and I’m excited to see what the night holds for all of us!

    Thank you to my readers and community for your unwavering support, and I’m looking forward to an unforgettable night at the Fresh Awards Gala Night! 🌿🍎🌸

    Categories
    Party ideas

    Dinner Party Decorating

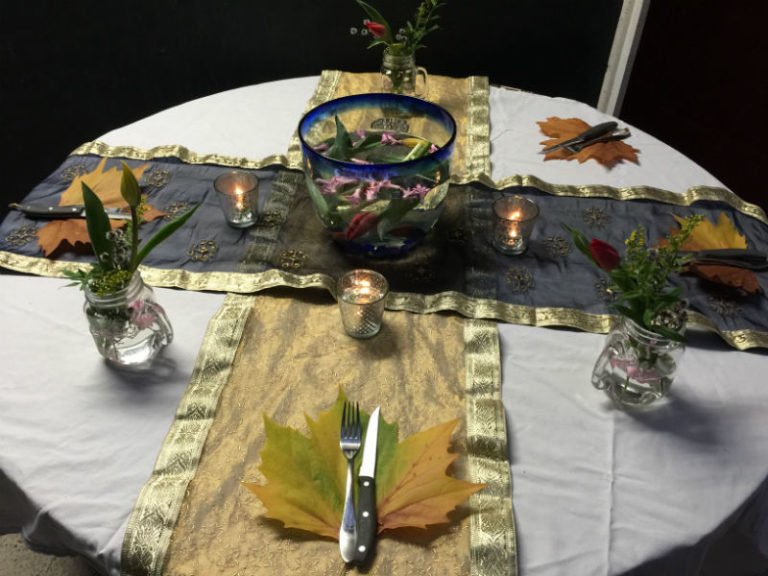
    Do you love to have dinner parties?

    Do you like to decorate the house for special occasions?

    If you answered yes to any of these questions I have some easy and quick ideas to make your next dinner party look amazing.

    The Grey Stirlingia looks so magical!
    The Grey Stirlingia looks so magical!


    A dinner party is an occasion that needs flowers.

    I, of course, love flowers and don’t need an excuse to buy more. Fab flowers cheer up the house and set the mood for a party.

    The yellow and red tulips that I got from Fine Flowers in Katoomba.
    The yellow and red tulips that I got from Fine Flowers in Katoomba.

    Fine Flowers at Katoomba have a great selection of flowers and help their customers ensure they have the right bunch of flowers for their needs.

    Fine Flowers at Katoomba.
    Fine Flowers at Katoomba.


    My goal was to create a magical autumn dinner party setting. The nice selection of flowers from Fine Flowers really allowed my vision to come to life.

    Magical Autumn Dinner Party - I told you it would look amazing!
    Magical Autumn Dinner Party – I told you it would look amazing!

    What did I create for my dinner party?

    1. A Flower Bowl Centrepiece
    2. Mason Jar Flower Arrangements
    3. Autumn Leaves for Table Decoration

    Items I used to decorate my dinner party


    • 3 Mason jars
    • 1 glass fruit bowl
    • Autumn leaves
    • Vase pebbles or other rocks to decorate the inside of your flower bowl
    • Table runners
    • Material or tablecloth to cover your table. Pick a contrasting colour to showcase the other decorations such as the leaves and flowers.
    • 3 Grey Stirlingia
    • 2 Pink Hyacinth
    • 6 Tulips (I purchased 3 yellow and 3 red)
    • 1 Yellow Solid Aster
    A close up of the flower bowl and see how it magnifies the flowers and other items.
    A close-up of the flower bowl and see how it magnifies the flowers and other items.

    The process

    Flower Bowl Centrepiece

    1. Fill the bowl with the decorative glass pebbles.
    2. Add the water to at least 3/4 full. You need to have the water to be able to submerge the flowers and any other greenery that you decide to add.
    3. Now you can add the flowers and other items that you wish to decorate the flower bowl. I added a red and yellow tulip. These were bent and put in a circle shape so that they would fit in the bowl. Each flower was on different sides to allow guests to see a different view of the centrepiece.
    4. Pink Hyacinth petals were also added to give a different colour and to add interest.

    Mason Jar Flower Arrangements

    1. Have the right number of mason jars at the ready. It doesn’t matter if they don’t match as long as they all work together.
    2. Cut the flowers to fit the jars. Some might be longer than others to give a different effect, for example, I kept the tulips and some of the greenery taller.
    3. Style the flowers. If it is not right move them in the right position. I had to move the Tulips on some of the jars, and also rearrange the Yellow Solid Aster and the Grey Stirlingia to have the arrangements be as I envisioned.
      Mason Jar Flower Arrangement with a Red Tulip, Pink Hyacinth petals, Grey Stirlingia and Yellow Solid Astor.
      Mason Jar Flower Arrangement with a Red Tulip, Pink Hyacinth petals, Grey Stirlingia and Yellow Solid Astor.


    4. You can have a few flowers or a lot in each mason jar, it is all down to the look you are going for. My look was a magical autumn night and therefore I went with yellows, reds and the wispy fluffy Grey Stirlingia created the right mood.  As you can see I didn’t add a lot of flowers to each jar.
    5. The placement on the table was important as well. I had two yellow Tulips left and one red one. I made sure that the red tulip was in-between the yellow ones.
    Mason Jar Flower Arrangement with a Yellow Tulip, Pink Hyacinth petals, Grey Stirlingia and Yellow Solid Astor.
    Mason Jar Flower Arrangement with a Yellow Tulip, Pink Hyacinth petals, Grey Stirlingia and Yellow Solid Astor.

    Autumn Leaves for Table Decoration

    1. To create something a little different I added some lovely bright and big autumn leaves.
    2. The leaves were marking each guest’s place at the table.
      Big Autumn Leaves to mark the dinner party guests place at the table.
      Big Autumn Leaves to mark the dinner party guests place at the table.


    3. On the top of the huge autumn leaves were a knife and fork all set and awaiting dinner to start.

    Tea Lights Add to the Magic

    The tea lights were added to tea light candle holders.
    The tea lights were added to tea light candle holders.
    The tea light candle holders did not over power the table setting with colour and just added to the light for the table during dinner.
    The tea light candle holders did not overpower the table setting with colour and just added to the light for the table during dinner.

    The light from the candles also helped give each diner a different view of the flower bowl centrepiece. The flowers were magnified by the water, the light bounced off different colours and textures and showcased the flowers in a different way.

    Candlelight is an essential element for dinner parties as well.


    I hope this has inspired you to create something different for your next dinner party.

    Sign up for my newsletter

    Stay current with all the things that are happening on Mummy to Twins Plus One. Don’t miss a thing by signing up for my newsletter. This newsletter will list all giveaways and fabulous things that are happening.


    This post has affiliate links

    Originally published April 16th 2018