Categories
Recipes

The Best Gingerbread Recipe

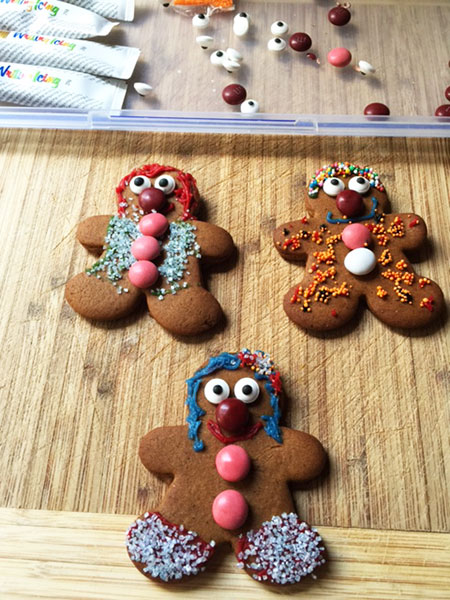
Do you love to make Gingerbread? Would you like to have one of the yummiest recipes there is for gingerbread? Then read on to download the recipe and to see my versions that I created.

Make the best ever gingerbread with this fab and prized recipe from Deniz Karaca the executive chef at EPICURE

I have been lucky enough to get my hands on Deniz Karaca’s prized gingerbread recipe.

Deniz is the executive pastry chef of EPICURE  in Melbourne. It is a popular restaurant that is known for providing seasonal, fresh, sustainable food using the best local produce available.

EPICURE has also set as benchmark for responsible catering. They have reduced their carbon footprint and prides itself by giving back to the community.

Making the Gingerbread

I had to test out the recipe to see how yummy and easy it was to follow. I must say that it was very easy and simple to do and rather tasty. I normally am not a fan of gingerbread but this mixture was very yummy. I had to test it before I even baked the biscuits.

I collected all my ingredients that I needed for the gingerbread. I like to have them all available on the kitchen bench. This way I don't forget anything essential.
I collected all my ingredients that I needed for the gingerbread. I like to have them all available on the kitchen bench. This way I don’t forget anything essential.

Step 1: Before I started I made sure that the oven was heating up. I put it on at 180°C.

Step 2: Get the baking trays ready for the finished gingerbread. The recipe says to use melted butter to grease baking trays. I did not do this, I used baking paper on the baking trays to ensure that the gingerbread did not stick to the tray. You can do either method. It does not matter.

Butter, Sugar, egg yolk and Treacle Syrup all ready to be a creamy mixture for the gingerbread.

Step 3: I put the butter and sugar and made it look pale and creamy.

gingerbread3_web

Step 4: Now add the treacle syrup, egg yolk, until all combined. Once done add the flour, bicarbonate of soda and mixed spice (In the recipe it lists all the ingredients in the mixed spice mix. I initially thought that I had to get all of these to make my own. However I realised that if you just get a pack of Mixed Spice. I know this might be obvious to some but as I have never made gingerbread before I did not know). Mix into a dough and kneed until smooth. Wrap up in glad wrap and put in the fridge to rest for 30 mins.

Mixing in the flour and other ingredients.

Note: I ended up leaving my mixture in the fridge overnight due to being busy with kids and things. Before I used it I put it on the kitchen bench for a few hours to get to room temperature, this made it soft enough to roll out to make my gingerbread people. The mixture was fine and the biscuits taste amazing the only thing you need to be aware of is if you leave it in the fridge longer it will be a bit harder and need time to soften up.

The gingerbread dough wrapped in glad wrap and ready to go into the fridge to rest. Rest in fridge for 30 mins.

Step 5: The recipe recommends putting baking paper underneath the dough and on top to ensure it does not stick to your rolling pin. I did this and it made it much easier to get the dough flat and made it not stick at all which helped the whole process.

Rolling the gingerbread dough. It was a good idea to use baking paper to make it a non sticky issue with the rolling pin and counter top.

Step 6: Cut out your gingerbread with your cookie cutter of choice. I used a traditional shaped gingerbread man one but you can use whatever shape you wish to. It depends on the event and theme. You might want Christmas ones, or birthday party ones or just standard gingerbread men. It is up to you.

I used a gingerbread shaped cookie cutter to make my gingerbread people. If you want you can always have different shapes, stars, trucks, people, cats and more.

Step 7: Bake your gingerbread biscuits. It takes about 10 minutes in the oven. Make sure you place the gingerbread biscuits about 3 cm apart from each other. The dough spreads a bit and you don’t want to find that one gingerbread person is attached to another.

Gingerbread all cooked and cooling down. Once cool they will be decorated.

Step 8: Decorate your gingerbread. This is the fun part. You can go crazy with sprinkles, icing and lollies. Once done you can now eat them up.

My decorated gingerbread people. Two are girls and one is a boy. I know it is hard to tell and my decorating skills need a bit of work. Don't they look pretty! Or festive to say the least.
My decorated gingerbread people. Two are girls and one is a boy. I know it is hard to tell and my decorating skills need a bit of work. Don’t they look pretty! Or festive to say the least.

Some of the items I used to decorate these fabulous gingerbread girls and boy were: candy eyes, hundreds and thousands, different coloured sprinkles, M&M’s, and Queen Writing Icings (I got a pack of 5 that have all different colours)

Enjoy your gingerbread and I hope you found this recipe as yummy as I did.

A HUGE THANK YOU!

Thanks to Deniz Karaca from EPICURE  for sharing his gingerbread recipe with my readers.

Originally published November 27 2016

Categories
Party ideas

Harry Potter Birthday Party

This year the girls wanted a Harry Potter or Wizard themed birthday party. (Read on to get the free takeaway – Harry Potter Cupcake Toppers)

I thought how do I get into the spirit of the Harry Potter theme?

The invitations are the way to set the scene.  Making sure that the invites are on track with the Harry Potter/Wizard theme is a good start.

I create my own for the twins birthday parties and this year was no exception.

The invitation that I created for the girls 9th birthday party. I got inspired by another invite I saw and used some of the text. The images were all ones that I found online and all are clip art so free to use.

To make my invitation have the right look I had to have the Harry Potter Font or something like it. Font Space have free Harry Potter fonts and are easy to download, install and start using.

Instructions if you are installing a font for your very own Harry Potter invitation:

  1. Download the font
  2. Install the font into the fonts folder in the control panel
  3. Once the font or fonts are now added to your fonts folder you should see them in Photoshop or other programs you use to create your invitation. (I used Photoshop but if you don’t have Photoshop you can use a free web based Photoshop like editor called PIXLR EDITOR)
  4. Now you have your fonts you can get creative with your invitation.

Now you have created your Harry Potter/Wizard invitations, the food and decor are something to think about.

What type of things will you serve to make the kids feel like they are at a Harry Potter Party? The twins told me that if it is not 100% Harry Potter that is okay, it just has to be wizard like.

Phew I thought, I was worried that it might not be exact and of course not accurately Harry Potter.

I googled for inspiration. I also went to Pinterest too.

Below is what I created for the party. I did my best to keep with the Harry Potter or Wizard theme. 

  1. I saw from Darla at Bakingdom that she did a coloured layered cake for each house in Harry Potter. After getting depressed about all the fancy cakes out there, I thought that this would be easier to do. I have done
    The different coloured layers of the Harry Potter Cake. This is to show the different houses.
    The different coloured layers of the Harry Potter Cake. This is to show the different houses.

    one similar the year or so before but it was a cake that had sweets inside...yep a surprise for everyone. I used the layered cake idea for the Harry Potter Party but did my own decorations.

    For the layers I added food colouring to four cakes to get one for each house:

    Gryffindor – Red
    Hufflepuff – Yellow
    Ravenclaw – Blue
    Slytherin – Greeen

  2. My decorations for the cake were piped out of dark chocolate in the shape of Harry Potter’s glasses and also the scar on his forehead. I also used chocolate stars that were already made in the cake section of the supermarket.
    The dark chocolate that I piped to form the decorations on the Harry Potter Cake. I got the exact shapes from a printed download and copied that. Once done I put in the fridge to set.
    The dark chocolate that I piped to form the decorations on the Harry Potter Cake. I got the exact shapes from a printed download and copied that. Once done I put in the fridge to set.
    The chocolate decorations for the Harry Potter cake. I kept it simple.
    The chocolate decorations for the Harry Potter cake. I kept it simple.
    Finished Harry Potter cake all ready for the party.
    Finished the Harry Potter cake all ready for the party.


  3. Sorting Hat Cupcakes – I saw them online and had to give them a go. Make your cupcakes. Cut a bit out of the middle and put in a few coloured M&M’s (I used the ones that didn’t have peanuts in case of allergies). The colours need to match the houses in Harry Potter. I did have to stand for a while and separate the colours I needed from a big bag of M&M’s. Once you have put the secret M&M’s into the cupcake put the cake back on top and then ice it. Decorate and done. Now do it the rest of them and then all your sorting hat cupcakes are organised. I made sure that there was an even number of each colour. Below are the colours I needed for the sorting hat cupcakes and as said got only those colours in six cupcakes each. I made chocolate vegan cupcakes with very dark chocolate icing. The icing was just icing sugar, organic cocoa powder from the health food shop, and water. This icing is just like pure chocolate and perfect for anyone who cannot have butter or other ingredients.

    Gryffindor – Red
    Hufflepuff – Yellow
    Ravenclaw – Blue
    Slytherin – Greeen
     
  4. Wizard Bread – Fairy bread but these were stars and therefore more wizardry than normal fairy bread. I had fresh bread on the day of the party, and simply cut out star shapes with a cookie cutter. Once all done I put a little bit of butter on each star and decorated them with hundreds and thousands.
    Yummy Wizard Bread
    Yummy Wizard Bread
  5. Broomsticks  I got the idea from One Little Project and this can also be used for Halloween as well. All you need is straight pretzels, cheese sticks that are able to be created into the end of the broom (I used Bega Stringers as the cheese allows you to take the ends and turn them up to look like a straw broom), and then you need some chives to tie around the base of the cheese and pretzel to make it look like the tie holding the broom and the handle together.Making the broomsticks is rather fiddly so if you are like me there might be a few words said when they don’t go your way. You need to be extra careful when you push in the pretzel into the cheese.One tip that helps is to make a hole in the cheese to allow the pretzel to go in easily, however be careful as it might make the cheese break too.
    Some my first broomsticks that I made. Don't they look awesome!
    Some my first broomsticks that I made. Don’t they look awesome!


    More broomsticks.
    More broomsticks.
    Broomsticks all ready for the kids to eat them at the party.
    Broomsticks are all ready for the kids to eat at the party.


  6. Magic Wizard Chocolate – I saw this online ages ago and have used it for a few parties now. I have made it different by some things I used in the chocolate and of course naming it Magic Wizard Chocolate helped make it more special for the party.
    To create the magic wizard chocolate. Firstly purchase some dark chocolate or the chocolate of choice to melt. You will need a couple of packs as you need to melt the chocolate and lay it on a big tray. If you have a lot of chocolate you can make two trays. You will be amazed at how quickly this gets eaten. I chose dark-cooking chocolate and got three packs of the chocolate. You then need to have sweets to stick into the melted chocolate before it hardens. Feel free to add whatever you wish as it is up to you and the theme of your party. I chose eyes, bright candy, Kit-Kats, raspberries, and sprinkles. Once the chocolate has set (I helped it along by putting it in the fridge). All you need to do is break it into little pieces so that the kids can just take a bite-sized part and not a whole bit of it. The eyes help it look a bit spooky so will be a perfect party treat for Halloween, monsters, and of course a wizard party like Harry Potter.
  7. Lolly Snakes – I made sure to have snakes as one house is called Slytherin and a birthday party really has to have more sweets it seemed to make sense.
    Slytherin snakes for the kids... of course they are not real but lollies instead.
    Slytherin snakes for the kids… of course, they are not real but lollies instead.


  8. Magic Chocolate Frogs – In Harry Potter there are chocolate frogs that fly away. Mine were not like this and nearly all the frogs got eaten to never return on the day. Sad but they were very yummy.
    Magic Chocolate Frogs and Wizard Chocolate
    Magic Chocolate Frogs and Wizard Chocolate

I made sure that all food had labels that fit in with the theme of the party. This way everyone got involved in the fun.

The birthday girls excited to cut the cake.
The birthday girls are excited to cut the cake.

There was also a seat that had invisible cloaks for anyone who needed one. Yep I wore mine although no one knew due to it being invisible.

Some great tips and more inspiration to throw an amazing Harry Potter Party is listed in the BuzzFeed’s article on 33 cheap ways to organise an epic Harry Potter Halloween Party


I hope this gives you some great ideas for a Harry Potter Party or even Halloween.

Inside the Harry Potter Cake for the girls 9th Birthday Party.


FREE TAKEAWAY BELOW!

I’ve created a fabulous download for you. Harry Potter Cupcake Toppers. Perfect for your next party.

Originally published October 24 2017

Categories
Recipes

Snot Drops

Are you looking for a spooky cookie to make for Halloween or a birthday party?


Make Snot Drops today! It will make everyone want to say, YUCKY!

This was a fun and super easy recipe to make, and I am sure that the kids would love helping out too.

All the ingredients you need to make the snot drops…well aside from the jam

Temu Up, Price Down

Snot drops are ready to be cooked in the oven.
Snot Drops cooked and cooling down..we cannot wait to try them.

Enjoy your snot drops and yes….I said you will enjoy snot drops. Trust me they are very yummy!


Sign up for my newsletter

Stay current with all the things that are happening on Mummy to Twins Plus One. Don’t miss a thing by signing up for my newsletter. This newsletter will list all giveaways and fabulous things that are happening.


This post has Affiliate Links

Originally published Oct 21, 2020

Categories
Recipes

Zombie Eyes

Want a very easy and a no-bake party treat?

This scary and spooky treat is simple to make and looks amazing, and no baking needed, so a win all round.

INGREDIENTS

  • Marshmallows – you can have the pink and white ones or just white it is up to you. Colour doesn’t matter.
  • Icing Pens – I used red but ran out so I ended up using a green and yellow icing pen also. As long as the colour looks spooky.
  • Smarties or M&M’s for the eyeball.

METHOD

  • Line up the marshmallows on a tray
  • Get the icing pen and draw squiggly lines all over them to reasonable bloodshot veins
  • Once all the icing is on the marshmallows you can then add the Smarties or M&Ms to the Marshmallow. It doesn’t matter what colour you add as long as it looks freaky and fun.

Now enjoy eating your zombie eyes and scaring your guests.

Make more Halloween Party Food with these inspirations from Amazon.

Sign up to get these fun and scary Monster Cupcake Toppers

This page has affiliate links
Categories
Party ideas

Making Birthday Parties Easy with Coles’ Vanilla Pink Drip Cake

Have you ever thought that birthday cakes should be easier?

What if they can be and you can take all the glory for not doing that much at all? Coles has the perfect cake to make you look like the best parent in the world.

The Coles Vanilla Pink Drip Cake will help your next party be a HUGE hit.

If you are not a fan of the Pink Drip Cake, you can also get a Chocolate Drip Cake

Our summer-inspired Coles Vanilla Pink Drip Cake

Coles Vanilla Drip Cake Makes Birthday’s Easier

I like any mum who wants to make their child’s birthday party special. Each year I ask each kid what they would like for their birthday, and I go out of my way to make it happen.

Hubby is a bit over all the trouble I go to and keeps on saying I should just get a cake from the shop and make it look pretty.

So when I was asked to test out the new Coles Vanilla Pink Drip Cake I thought this might be the answer to making birthday’s easier.


What did the girls choose as decorations?

The kids wanted to make it a summer cake filled with tropical decorations.

I think they did an amazing job and had fun too.

I think next time I have a party I will make things easier for myself. As a mum, there is so much to do and to organise, if you can get more time back it is a win, right?

Will you be testing out the Coles Vanilla Pink Drip Cake?

Did you know that the Coles Drip Cakes was voted product of the year for 2020?

I can see why it won product of the year, it’s yummy and a stunning-looking cake.

COLES VANILLA PINK DRIP CAKE
The Coles vanilla pink drip cake is a stunning and cost-effective solution to creating the cake of your dreams! The white icing with a delectable pink drip puts this stunning dessert on par with the decadent, Insta-worthy cakes that are continuously popping up. This cake is light, fluffy and drizzled with a sweet pink topping and makes the perfect base for decorating and dressing as you see fit! Whether it’s for a bridal shower, kids’ birthday party or just for impressing your guests after dinner, the Coles pink drip cakes are perfect for every occasion.
RRP $28.00
Available at Coles.

I hope this gives you some ideas on how to make your next celebration fantastic with this super stylish cake.

Sign up for my newsletter

Stay current with all the things that are happening on Mummy to Twins Plus One. Don’t miss a thing by signing up for my newsletter. This newsletter will list all giveaways and fabulous things that are happening.

This page contains affiliate links

Posted first on Feb 21st 2020

Categories
Party ideas

Dinner Party Decorating

Do you love to have dinner parties?

Do you like to decorate the house for special occasions?

If you answered yes to any of these questions I have some easy and quick ideas to make your next dinner party look amazing.

The Grey Stirlingia looks so magical!


A dinner party is an occasion that needs flowers.

I, of course, love flowers and don’t need an excuse to buy more. Fab flowers cheer up the house and set the mood for a party.

The yellow and red tulips that I got from Fine Flowers in Katoomba.

Fine Flowers at Katoomba have a great selection of flowers and help their customers ensure they have the right bunch of flowers for their needs.

Fine Flowers at Katoomba.


My goal was to create a magical autumn dinner party setting. The nice selection of flowers from Fine Flowers really allowed my vision to come to life.

Magical Autumn Dinner Party - I told you it would look amazing!
Magical Autumn Dinner Party – I told you it would look amazing!

What did I create for my dinner party?

  1. A Flower Bowl Centrepiece
  2. Mason Jar Flower Arrangements
  3. Autumn Leaves for Table Decoration

Items I used to decorate my dinner party


  • 3 Mason jars
  • 1 glass fruit bowl
  • Autumn leaves
  • Vase pebbles or other rocks to decorate the inside of your flower bowl
  • Table runners
  • Material or tablecloth to cover your table. Pick a contrasting colour to showcase the other decorations such as the leaves and flowers.
  • 3 Grey Stirlingia
  • 2 Pink Hyacinth
  • 6 Tulips (I purchased 3 yellow and 3 red)
  • 1 Yellow Solid Aster
A close up of the flower bowl and see how it magnifies the flowers and other items.
A close-up of the flower bowl and see how it magnifies the flowers and other items.

The process

Flower Bowl Centrepiece

  1. Fill the bowl with the decorative glass pebbles.
  2. Add the water to at least 3/4 full. You need to have the water to be able to submerge the flowers and any other greenery that you decide to add.
  3. Now you can add the flowers and other items that you wish to decorate the flower bowl. I added a red and yellow tulip. These were bent and put in a circle shape so that they would fit in the bowl. Each flower was on different sides to allow guests to see a different view of the centrepiece.
  4. Pink Hyacinth petals were also added to give a different colour and to add interest.

Mason Jar Flower Arrangements

  1. Have the right number of mason jars at the ready. It doesn’t matter if they don’t match as long as they all work together.
  2. Cut the flowers to fit the jars. Some might be longer than others to give a different effect, for example, I kept the tulips and some of the greenery taller.
  3. Style the flowers. If it is not right move them in the right position. I had to move the Tulips on some of the jars, and also rearrange the Yellow Solid Aster and the Grey Stirlingia to have the arrangements be as I envisioned.
    Mason Jar Flower Arrangement with a Red Tulip, Pink Hyacinth petals, Grey Stirlingia and Yellow Solid Astor.
    Mason Jar Flower Arrangement with a Red Tulip, Pink Hyacinth petals, Grey Stirlingia and Yellow Solid Astor.


  4. You can have a few flowers or a lot in each mason jar, it is all down to the look you are going for. My look was a magical autumn night and therefore I went with yellows, reds and the wispy fluffy Grey Stirlingia created the right mood.  As you can see I didn’t add a lot of flowers to each jar.
  5. The placement on the table was important as well. I had two yellow Tulips left and one red one. I made sure that the red tulip was in-between the yellow ones.
Mason Jar Flower Arrangement with a Yellow Tulip, Pink Hyacinth petals, Grey Stirlingia and Yellow Solid Astor.

Autumn Leaves for Table Decoration

  1. To create something a little different I added some lovely bright and big autumn leaves.
  2. The leaves were marking each guest’s place at the table.
    Big Autumn Leaves to mark the dinner party guests place at the table.
    Big Autumn Leaves to mark the dinner party guests place at the table.


  3. On the top of the huge autumn leaves were a knife and fork all set and awaiting dinner to start.

Tea Lights Add to the Magic

The tea lights were added to tea light candle holders.
The tea light candle holders did not over power the table setting with colour and just added to the light for the table during dinner.
The tea light candle holders did not overpower the table setting with colour and just added to the light for the table during dinner.

The light from the candles also helped give each diner a different view of the flower bowl centrepiece. The flowers were magnified by the water, the light bounced off different colours and textures and showcased the flowers in a different way.

Candlelight is an essential element for dinner parties as well.


I hope this has inspired you to create something different for your next dinner party.

Sign up for my newsletter

Stay current with all the things that are happening on Mummy to Twins Plus One. Don’t miss a thing by signing up for my newsletter. This newsletter will list all giveaways and fabulous things that are happening.


This post has affiliate links

Originally published April 16th 2018

Categories
Family

10th Birthday, Billy Carts & Unicorn Horn Failure

Last Thursday (the 13th) was the girls 10th birthday.

I was busy getting everything ready for the twins birthday week and birthday party on the weekend.

Wednesday night I stayed up late creating cupcakes for each kids classroom. Due to the girls being in different classes I had to create over 50 cupcakes!

The total for the cupcakes was 56 and also one very tired mummy.

I ended up going to bed at 11.50pm and of course, Alexander woke at 4.20am and decided to stay up all day! He would not go to bed.

I was struggling to keep my eyes open. Alex eventually fell asleep in the car on the way to pick the kids up from school. Typical! After we got home I put him to bed and he slept until 4am the next morning. Yes again with waking at 4am!

Wednesday after school the twins wanted to purchase birthday presents for each other. They both have their own Spriggy Cards. (Spriggy Cards is a debit card just for kids.  A modern way to do pocket money)

Each kid had their cards and raced around BigW getting a present for her sister.   (More on the blog soon about the Spriggy Cards – If you wish to get a Spriggy Card for your kids here is my referral code: TWINSPLUSONE.)

Each kid came up and showed me what they got their sister and each kid got the same things.
I asked if they talked to her sister and I got told no, so the only thing I can think is that they are definitely identical twins.

Lillian bought this Harry Potter LEGO set to share with Julia.

I don’t know how they did it but everything was the same! Once home each kid wrapped their presents for each other and was very happy with themselves as they have never bought presents for each other on their birthday before.

You might think that two sleepless nights due to Alexander waking early and staying up late to organise birthday things were bad, but I’ve had about three or more weeks of Alexander waking at all hours and I’m so tired.

Haunted house billy cart.

Not only was the twins birthday Thursday and Wednesday was busy, but the twins also had Billy Card Derby on Friday.

I stayed at school all day to see them race as they were teaming up with different kids and their races were at different times.

Rabbit billy cart.
Rabbit billy cart.

The Billy Cart Derby happens every two years at the girl’s school. It is a huge fundraiser for the school to purchase much-needed equipment.

Next time the Billy Cart Derby will happen the girls will be in grade six (last year of primary) and it will be around the same time as their birthday too.

Julia the Rabbit and Lillian the Vampire. Dressed up and ready for Billy Cart Derby.

Being at the school all day meant that no cake for the Saturday birthday party got made.

I was exhausted! Now I needed to make a cake during the evening and all I wanted to do is go to bed.

I decided for the first time to purchase some sponges from the supermarket and just decorate them.  This is the first year I have not made a cake and only purchased some due to being so tired.

Vanilla and chocolate sponges purchased from Woolworths and all I needed to do is ice, and decorate.

The Unicorn Cake before we went to the Roller Skating Party.

It ended up being late Friday night and I couldn’t get the unicorn horn right.

The twins requested a unicorn cake this year, however, I feel that I need lessons to get the horn looking better.

Hubby and others thought that it looked like pooh or like a penis… yes sad but true!    I think kids liked it and due to being so tired I think the cake was not the best it could be.

I couldn’t get the icing to sit on the wooden skewer so had to mold it more. No detail was shown and it was too fat!

The Unicorn Cake for the kids 10th Birthday.


I also used natural food dye this time and it didn’t go into the icing for the horn. I ended up putting glittery decorations on it instead. Maybe normal food dye would have worked out better.


The girls had their 10th birthday party at Penrith Skatel . Each kid wished to have something different this year. We thought a roller skating party would be fun.

The girls with their friends at their roller skating party.

The girls told me that this was the BEST PARTY EVER!

Lillian skating and having fun at her birthday party.

The Skate Rink provided chips and nibbles and we paid a little extra for the hot food option for all kids.

The party food came with an ice cream cake and this was a blessing as it was over 34 degrees on Saturday.

The girls 10th birthday at the Penrith Roller Skating RInk.

I will do another unicorn cake when I’ve had more sleep and figure out how to make the horn better. Once organised I will post.

I’m happy the kids had a great birthday, roller skating party and billy cart derby day was a success too.

This success was good regardless of the unicorn horn failure… I did make it look pretty.

Have you had a cake fail? Did it matter? Or just to you?


Sign up for my newsletter

Stay current with all the things that are happening on Mummy to Twins Plus One. Don’t miss a thing by signing up for my newsletter. This newsletter will list all giveaways and fabulous things that are happening.


Categories
Party ideas

Adventure Time Party Prep

The kids have asked to have an Adventure Time themed birthday party this year. So of course I said yes. However then they both asked for a Lumpy Space Princess Cake. Have you seen Lumpy Space Princess? If you have you will know that she is an odd shape and not very easy to do in a cake. See image of LSP (Otherwise known as Lumpy Space Princess) below:

Lumpy Space Princess. Now you see what I mean about the odd shape. Of course the twins want a cake like this! I hope I can pull it off.

I have thought long and hard about the cake issue and the shape that LSP needs to be and wondered how to achieve it. I have concluded that the only way I can do it is with a whole bunch of cupcakes strategically positioned to look like LSP. I of course will have them with purple icing and one will have the yellow star and others with have the eyes and mouth. You get the idea. I have not practiced and plan to do it the day before the party. So that does not give me a lot of time. I’m being positive and I am seeing that all be fine… at least that is what I am telling myself.

Have you made a cake this shape before? Did you decide to do cupcakes and put it all together like I’m planning? Let me know.

So other than the cupcake birthday cake that I am going to create, what else am I going to serve for this party.

Food Ideas

  • Chips
  • Fairy bread
  • Dip with carrots, cucumber and crackers
  • Vegan chocolate cupcakes (these taste like mud cake and are so yummy)
  • Chocolate that has all sorts of sweets and eyes on it (it looks like it comes from the land of Adventure Time)
  • Fruit – Watermelon and Strawberries
  • I also have some sweets on offer that are standard at birthday parties and for the thank you bags

I also have 100% juice poppers and water for the kids as well.

Saw this online and had to give it a go. Step 1: Melt chocolate. Step 2: Pour chocolate onto baking paper. Step 3: Add decorations. Step 4: Wait for chocolate to dry and harden, then crack into little bits to serve for your party or as an addition to a cake. ‪#‎kids‬ ‪#‎partyfood‬ ‪#‎foundonline‬ ‪#‎birthdaypartyideas‬ ‪#‎kidsbirthday‬ ‪#‎twins‬ ‪#‎cooking‬ ‪#‎birthdayparty‬


Party Game Ideas

  • Princess Bubblegum says. I saw this on another website and it is just another variation on “Simon Says”. Instead of Simon you have Princess Bubblegum and she/he runs the game.
  • Scavenger Hunt or Quest. Place prizes around the park or yard and have clues to get to the next one. The last one is the biggest prize or just have a lot of little prizes to give everyone a little something.


I created 48 cupcakes today so that the kids could have a birthday celebration at school. Due to them being in different classes this meant double the cupcakes, however it will be nice that the kids have a moment to enjoy their birthday on their own in class.

Cupcakes all ready for school tomorrow.

Tomorrow I have a whole day of baking, tidying, and sorting things out to be ready for the party on Saturday. I will post a picture of the finished cake. All I can say is that I am sure it will be purple and of course lumpy. If it is exactly or more like the picture that will be a good effort, however we will see.

Have you been asked to make a weird shaped cake? Was it LSP? (Lumpy Space Princess) If so what did you end up creating? I would love to see photos.

If you would like to share your cake creations, please post the photos on Mummy to Twins Plus One Facebook Page.


Categories
4 years and beyond

Octo Success

Yesterday was the twins 5th birthday party, they are not five yet, but we will be away for their actual birthday so wanted the girls to have a party with their mates before we leave on our holiday.

Two days before their party hubby and I stayed up late to get all organised and sorted.

The day before the party I spent most of it in the kitchen, making fish biscuits otherwise known as sugar cookies, vegan cupcakes for those who cannot eat the cake and then later that night I made the cake. After 1am or later, the cake was finished, I was pleased with it. It looked like Kwazii Cat, so that was an achievement.

Kwazii Cake, made by me.

The candle did not stay lit as the wind picked up. This is the only picture I had with the candle lit as it went out soon after.

A week before the day of the party we checked what the weather was going to be like and it said 90% chance of showers, gosh not good. We are having the party at a park and they don’t have undercover shelter.

What would we do if this forecast was correct? Not sure really. However this was not to be, the weather was sunny, hot and just great. The only thing that was a bit of an annoyance was the wind picked up a little bit but it was not gale force winds so cannot complain about it.

We had a great turn out and the kids were super happy to see all their friends and our family and extended family friends that joined us to celebrate the kids turning five.  It was a nice day and fun was had by all. Today it has been overcast, cooler and threatening rain. We were very lucky that we did well with the weather.

I wanted to make sure the kids had fun with the food as it was an Octonauts party, and got some inspiration from another blogger on my post about Octonaut Party Preparation.

Worm Tails
Worm Tails

Crab Shells
Crab Shells

Vegan Cupcakes
Vegan Cupcakes

We changed the name of certain foods for a bit of fun.

Jaffas were called crab shells, snakes were called electric eels, other lollies were called worm tails. Apple juice was whale wee, orange juice was octopus ink, and water was called sea water.

Octopus Ink
Octopus Ink

Sea Water
Sea Water

It was very funny when kids were asking for more whale wee and sea water. Hilarious actually!

The labels were done by using Avery Labels. It was made even easier by their online template to make sure it prints fine with your images. So easy to use and worked a treat.

If you need to do labels, this is ideal.  For the rectangular labels we used L7109 Avery Labels and for the round labels we used L7102.

When we printed we used the best photo for the quality and for the paper type we chose glossy photo paper.  They came out brilliantly.

Avery Labels
Avery Labels


I even made Tunip's fish biscuits.
I even made Tunip’s fish biscuits.

One of the mothers that came along did some water bombs with the kids and they were a hit.

Having fun with a water bomb

Water fun
Water fun

Kids were exhausted and happy after their day at the park and the party. We came home with some family and had a cuppa tea and kids unwrapped presents. The girls were very surprised as they have finally got the presents they have been asking for.

A successful day. Hubby and I were so tired and collapsed after dinner with a glass of wine. Phew another party done for another year.

Are you planning your child/children’s birthday party? Or is it your partners/wife/hubby’s?


It is a big job but pleasing when it all works out well. Send in your comments.


Sign up for my newsletter

Stay current with all the things that are happening on Mummy to Twins Plus One. Don’t miss a thing by signing up for my newsletter. This newsletter will list all giveaways and fabulous things that are happening.