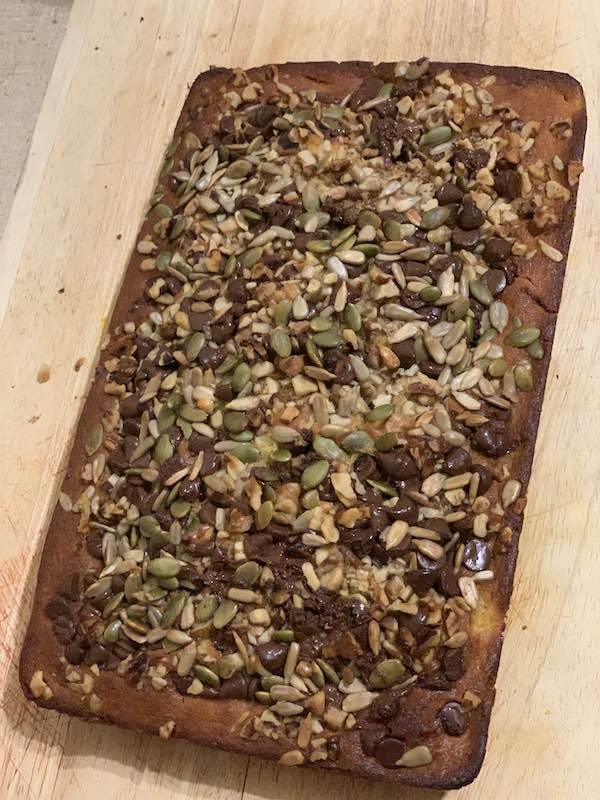
Categories
Recipes

Make Choc Chip Pumpkin Bread

Have you wanted a tasty and healthy (well there are some healthy ingredients) treat for the lunch box or afternoon tea? How about adding pumpkin to a recipe, if you are worried it doesn’t taste like pumpkin at all just has the healthy benefits of pumpkin.

If you said yes, then I have a great recipe for you.

Choc Chip Pumpkin Bread - Yummy and all ready to eat!
Choc Chip Pumpkin Bread – Yummy and all ready to eat!

Make it easy and download the recipe card and instructions

INGREDIENTS

  • 2 cups (300g) self-raising flour
  • 50g butter melted
  • 2 Eggs
  • 2/3 cup (130g) dark choc chips
  • 1/2 cup (55g) chopped walnuts
  • Pepitas (pumpkin seeds) and sunflower seeds
  • 1 cup (220g) brown sugar
  • 1 cup (250g) mashed pumpkin (I made my own)
  • 1/2 cup (125ml) buttermilk

SET THE OVEN FOR  180°C   OR    356°F

My fresh made pumpkin mash all ready to make Choc Chip Pumpkin Bread
My freshly made pumpkin mash all ready to make Choc Chip Pumpkin Bread

METHOD

Step 1: Make your own Pumpkin Mash

I made my own pumpkin mash. I measured the correct amount of pumpkin needed. Then took off the skin. I added a little water to a saucepan and then added the cut-up pumpkin. I cooked until it was soft to make a mash. I cooled it a little to be not hot when it was added to the other dry and wet ingredients.

You don’t need to create your own mash, but it was super simple and easy to create, and it meant it was all fresh.  If you would rather not do your own mash you can buy canned pumpkin mash and then add it to the mixture.

Step 2: Mix all ingredients into a bowl and make sure they are mixed well.

How good does this look....I want a piece now. All cooked and amazing looking choc chip pumpkin bread.
How good does this look….I want a piece now. All cooked and amazing looking choc chip pumpkin bread.

Step 3: In a buttered tin (I used a big rectangle one that is good for bigger cakes), put in all the mixture. Make sure that it is all level and the top of the cake looks smooth. If you need to use a knife to smooth out the top.

Step 4: Add the dark chop chips, walnuts, pepitas and sunflower seeds to the top of the cake. I found that since the mixture was a bit thicker than a standard cake the seeds and choc chips stayed on the top, whereas a standard cake means that these items would have fallen into the cake and stuck to the bottom.

You can add any seeds you wish, so if you prefer something else add those.

Step 5: Cook for about 1 hour or until a skewer comes out cleanly of the cake/bread. I checked often as I was unsure if an hour was too long. I think it got close to being in the oven for an hour.

Step 6: Eat your yummy choc chip pumpkin bread – share with friends or just have it for yourself for afternoon tea.

Yummy Choc Chip Pumpkin Bread all ready to eat

I hope you enjoy this yummy recipe.

Sign up for my newsletter

Stay current with all the things that are happening on Mummy to Twins Plus One. Don’t miss a thing by signing up for my newsletter. This newsletter will list all giveaways and fabulous things that are happening.


This post has affiliate links

Originally published October 11, 2019

Categories
Beauty

DIY Pumpkin Beauty Products

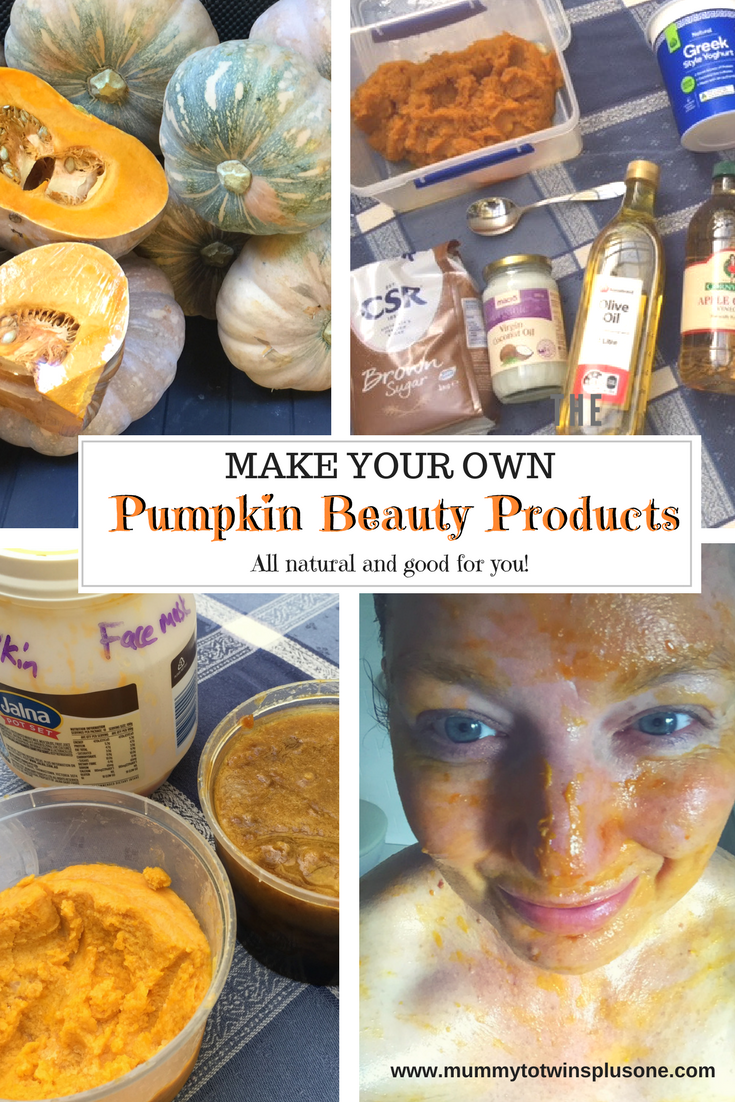
Have you ever wondered how easy it is to create your own natural beauty products? How about making pumpkin beauty products?

I know I have and thought it would be hard, in fact it is super easy and fun. However, it can get a bit messy, so take care.

Autumn is here, and cooler weather means hearty food; Stews, casseroles, roast meat with vegetables and more.

Pumpkin is one of my favourites. What about you?

Some things I love to make with pumpkin are mash, roast pumpkin and pumpkin chips with a little bit of cheese melted over them. What is your favourite pumpkin dish?

Pumpkin all cut up and ready to be turned into mash.

I stocked up on pumpkins from my local greengrocer, The Veggie Patch at Blackheath.  Getting your fruit and veg from a local greengrocer is great.

Look at all these yummy pumpkins. Perfect for dinner and then to make some healthy and natural beauty products.

The best place for fresh fruit and vegetables at Blackheath, The Veggie Patch.

The Veggie Patch at Blackheath

The idea of using the left over pumpkin mash means that my body is getting the vitamins on the skin, it is all natural, there is less waste, it is good for me.

“Healthy food inside and healthy natural products outside”

How to make Pumpkin Mash?

Firstly, you need to cut up your pumpkin into smaller chunks. Making all the pumpkin into similar sizes means that it will be cooked quickly, and all the pumpkin will cook at the same rate.

Once all done put a cup or two of water into a saucepan and boil the water. Once boiling add the pumpkin and leave on the stove until it is all soft and ready to be mashed up.

If you are using the mash for eating you generally add some milk and butter, plus you could add other items to the mash, for example onions, and crushed up almonds or pumpkin seeds.

If you are using the pumpkin mash for beauty products, then just mash it up and put it in a sealed container until you are ready to create your own handmade works of beauty.

The pumpkin is all cooked and now ready to mash up to be mash!

What are the health benefits of pumpkin?

  • Great source of fibre
  • High in beta-carotene
  • May help with reducing diabetes, heart disease, and some cancers and also help delay ageing and body degeneration.
  • Pumpkins also have calcium, magnesium and some B vitamins.
  • Beta-carotene helps boost the immune system.
  • Pumpkins are high in antioxidants – Vitamin C, and Vitamin E.

Testing out the Pumpkin Body Butter. It is so wonderful on my skin and leaves it so smooth.

Why is it good for your skin?

Pumpkins are a great source of Vitamin A and Vitamin C. These helpful vitamins help soften skin while improving any damaged cells. What a powerful vegetable is the pumpkin!

What did I use to create my pumpkin beauty products?

All the items I needed for my homemade pumpkin beauty products. Some were good enough to eat!

  • Mashed Pumpkin
  • Brown Sugar
  • Coconut Oil
  • Olive Oil
  • Yoghurt
  • 1 egg
  • The Apple Cider Vinegar was for the Pumpkin Face Mask for oily skin, but I didn’t make this one. Read on to see the recipe for this face mask as well.
  • Honey
  • Measuring cups
  • Spoons
  • Containers to store the products in

Make sure to refrigerate your items after you make them. They are made with real vegetables and therefore will perish if not kept well. Use quickly and enjoy!

Testing out my pumpkin hair conditioner, it made my hair feel very soft afterwards.
Testing out my pumpkin hair conditioner, made my hair feel very soft afterwards.

What pumpkin beauty products did I make?

I’ve created a sheet so that you can have all the info in one spot, download all the pumpkin beauty recipes in one PDF printable.

  • Pumpkin Body Sugar Scrub
    Mix 1 cup of pumpkin mash with 1 cup of sugar. Add a tablespoon of olive oil and mix together until you make a paste.

    Making the Pumpkin Body Sugar Scrub
    Making the Pumpkin Body Sugar Scrub
  • Pumpkin Body Butter
    Mix 1 cup of pumpkin mash with 1 cup of coconut oil. You can make a smaller batch, but if you are like me you will love this and so will your skin.
    I ended up putting the mixture in my blender to get all the lumps of the coconut oil out. Smother over your skin during a shower.

    The Pumpkin Body Butter is my favourite product.

    Mixing up the ingredients for the Pumpkin Body Butter. It is sooooooooo good!
    Mixing up the ingredients for the Pumpkin Body Butter. It is so good!

    My skin gets so dry during Autumn and Winter, the cooler air zaps the moisture from my skin and means I need to be vigilant with the body moisturiser.

  • Pumpkin Face Mask for Dry Skin
    Mix 1/4 cup of pumpkin with 1 teaspoon of olive oil, 1 teaspoon of honey and 1 whole egg. Mix until all smooth, then you test it out. I left it on for 20 minutes.

    Trying out my new Pumpkin Face Mask for Dry Skin
    Trying out my new Pumpkin Face Mask for Dry Skin
  • Pumpkin Sugar Lip Scrub
    Mix 1 teaspoon or 1/4 teaspoon of pumpkin mash with a 1/4 teaspoon of olive oil (or you could use coconut oil), and add 1 teaspoon or half a teaspoon of fine sugar (I used brown sugar).
    Mix all ingredients together, and then rub on lips to exfoliate.

    The brown sugar I used in the pumpkin beauty products. Adding this made the Pumpkin Sugar Lip Scrub smell amazing!
    The brown sugar I used in the pumpkin beauty products. Adding a little bit of this made the Pumpkin Sugar Lip Scrub smell amazing!
  • Pumpkin Hair Conditioner
    Mix 1 cup pumpkin mash and 1 cup of yoghurt, plus a teaspoon of honey.  I couldn’t help myself as this mixture smelt amazing I had to have a taste, and it was so yummy!
    What other hair conditioner could you eat as well?
    Leave for 30 minutes. Have a shower afterwards to make sure it is all washed out.

    The Pumpkin Hair Conditioner is complete and ready to use.
    The Pumpkin Hair Conditioner is complete and ready to use.

    The The Pumpkin Hair Conditioner smelt so yummy I had to have a taste, and yes it was wonderful!
    The The Pumpkin Hair Conditioner smelt so yummy I had to have a taste, and yes it was wonderful!

I didn’t make the below pumpkin face mask. My skin is rather dry, so I wanted a mask that will help my skin feel more hydrated.

  • Pumpkin Face Mask for Oily Skin
    Here is the breakdown of how to make this other pumpkin face mask:
    Mix 1/4 cup of mashed pumpkin with 1 whole egg, add 1 tablespoon of Apple Cider Vinegar and mix together. Leave on for 20 minutes then wash off.

All pumpkin beauty products that I made. The one in the big bowl is the pumpkin face mask for dry skin, I was about to put it into my recycled yoghurt container.

What else can you make with pumpkins?

For the body: Soap, foot scrub, and other face masks.

To eat: Cakes, soups, pumpkin butter, pies, drinks, bake the seeds to eat later, muffins, smoothies, add to your breakfast cereal (oats), use the mash as baby food or addition in meals to help kids eat more veggies.

For fun: Halloween lanterns and bowls for a dip at parties.

I hope this post gives you some inspiration to make your own cheap pumpkin beauty products.

Sign up for my newsletter

Stay current with all the things that are happening on Mummy to Twins Plus One. Don’t miss a thing by signing up for my newsletter. This newsletter will list all giveaways and fabulous things that are happening.

Originally published April 14 2018

Categories
5 years and beyond

Making a Pumpkin Jack-o’-Lantern

The girls and the pumpkin

The kids have been excited about Halloween due to all the stuff at the shops. Previous years they were not that much into it, although any excuse to get lollies, right? When we were at Woolworths they were selling pumpkins and had instructions on how to create your own pumpkin jack-o’-lantern. I had never done before and was not sure how to even attempt it. The girls wanted to do one and I thought why not. They were cheap, only a couple of dollars so well worth a go and not going to break the bank. I followed the instructions as were listed.

  • I cut little cuts on the top of the pumpkin to take the top of, after a while the top came off cleanly.
  • Once the top was off I was then able to clean out the body of the pumpkin and there was a lot of muck and seeds, as you might imagine.
  • When the inside was clean enough I started on the eyes and mouth of the jack-o’-lantern.
  • The instructions said to trace the eyes and mouth onto the pumpkin, I found that hard. Maybe if you want to do this get some sticky tape and make sure the sheet with the instructions is fixed in place. I ended up getting a marker and drawing mine on while looking at the instructions to get a guide for the shapes.
  • I then did little cuts for the eyes and mouth until the bits came out and then I cleaned it up.
  • I dried it out a bit by the heat of the oven and then it was o.k to put a candle in it.

 pumpkinhugs

 pumpkindone

Why not give it a go yourself. This is my first try at it and I think it has worked very well. Now I’m a pumpkin jack-o’-lantern expert. I will be holding classes soon on the subject! Note that the mouth has some teeth on the top and the right and none on the left. It was meant to show that this Jack character has been evil and in fights, so has lost his teeth! What a wicked Jack this one is!

pumpkinlit2

Have you created your own jack-o’-lantern for Halloween? Or does someone else do it for you? I was frightened of it but now I am a pro! Let me know how you have gone if you are busy carving your own.

Categories
5 years and beyond Uncategorised

Making a Pumpkin Jack-o'-Lantern

The girls and the pumpkin

The kids have been excited about Halloween due to all the stuff at the shops. Previous years they were not that much into it, although any excuse to get lollies, right? When we were at Woolworths they were selling pumpkins and had instructions on how to create your own pumpkin jack-o’-lantern. I had never done before and was not sure how to even attempt it. The girls wanted to do one and I thought why not. They were cheap, only a couple of dollars so well worth a go and not going to break the bank. I followed the instructions as were listed.

  • I cut little cuts on the top of the pumpkin to take the top of, after a while the top came off cleanly.
  • Once the top was off I was then able to clean out the body of the pumpkin and there was a lot of muck and seeds, as you might imagine.
  • When the inside was clean enough I started on the eyes and mouth of the jack-o’-lantern.
  • The instructions said to trace the eyes and mouth onto the pumpkin, I found that hard. Maybe if you want to do this get some sticky tape and make sure the sheet with the instructions is fixed in place. I ended up getting a marker and drawing mine on while looking at the instructions to get a guide for the shapes.
  • I then did little cuts for the eyes and mouth until the bits came out and then I cleaned it up.
  • I dried it out a bit by the heat of the oven and then it was o.k to put a candle in it.

 pumpkinhugs

 pumpkindone

Why not give it a go yourself. This is my first try at it and I think it has worked very well. Now I’m a pumpkin jack-o’-lantern expert. I will be holding classes soon on the subject! Note that the mouth has some teeth on the top and the right and none on the left. It was meant to show that this Jack character has been evil and in fights, so has lost his teeth! What a wicked Jack this one is!

pumpkinlit2

Have you created your own jack-o’-lantern for Halloween? Or does someone else do it for you? I was frightened of it but now I am a pro! Let me know how you have gone if you are busy carving your own.