Categories
Party ideas

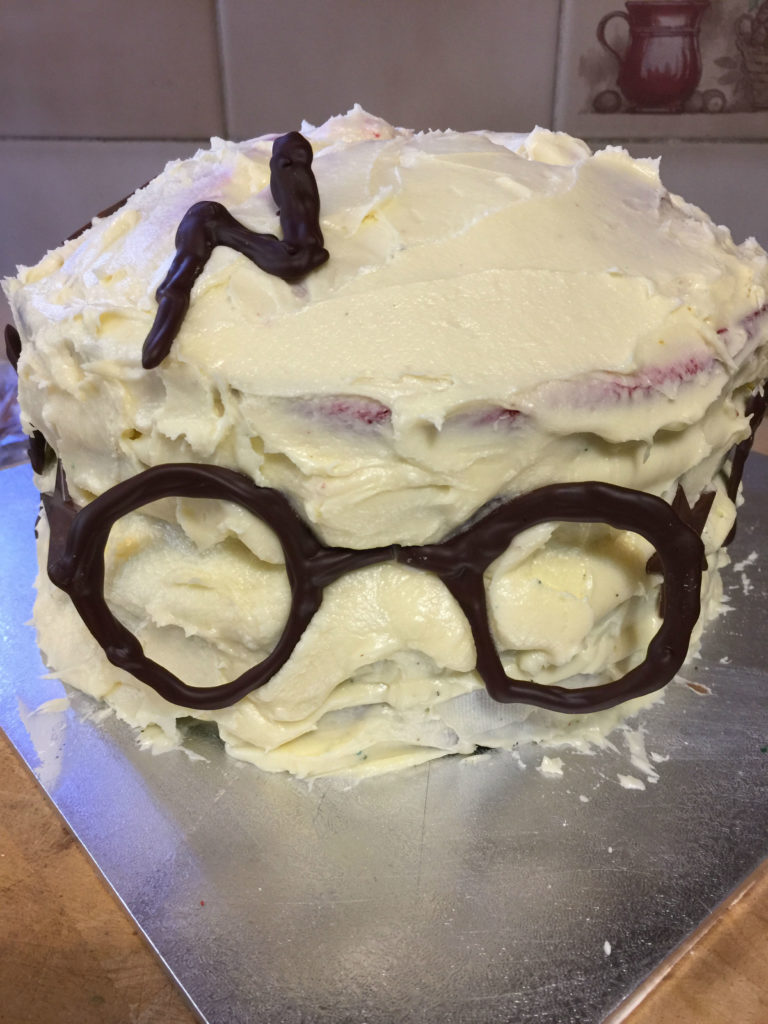
Harry Potter Birthday Party

This year the girls wanted a Harry Potter or Wizard themed birthday party. (Read on to get the free takeaway – Harry Potter Cupcake Toppers)

I thought how do I get into the spirit of the Harry Potter theme?

The invitations are the way to set the scene.  Making sure that the invites are on track with the Harry Potter/Wizard theme is a good start.

I create my own for the twins birthday parties and this year was no exception.

The invitation that I created for the girls 9th birthday party. I got inspired by another invite I saw and used some of the text. The images were all ones that I found online and all are clip art so free to use.

To make my invitation have the right look I had to have the Harry Potter Font or something like it. Font Space have free Harry Potter fonts and are easy to download, install and start using.

Instructions if you are installing a font for your very own Harry Potter invitation:

  1. Download the font
  2. Install the font into the fonts folder in the control panel
  3. Once the font or fonts are now added to your fonts folder you should see them in Photoshop or other programs you use to create your invitation. (I used Photoshop but if you don’t have Photoshop you can use a free web based Photoshop like editor called PIXLR EDITOR)
  4. Now you have your fonts you can get creative with your invitation.

Now you have created your Harry Potter/Wizard invitations, the food and decor are something to think about.

What type of things will you serve to make the kids feel like they are at a Harry Potter Party? The twins told me that if it is not 100% Harry Potter that is okay, it just has to be wizard like.

Phew I thought, I was worried that it might not be exact and of course not accurately Harry Potter.

I googled for inspiration. I also went to Pinterest too.

Below is what I created for the party. I did my best to keep with the Harry Potter or Wizard theme. 

  1. I saw from Darla at Bakingdom that she did a coloured layered cake for each house in Harry Potter. After getting depressed about all the fancy cakes out there, I thought that this would be easier to do. I have done
    The different coloured layers of the Harry Potter Cake. This is to show the different houses.
    The different coloured layers of the Harry Potter Cake. This is to show the different houses.

    one similar the year or so before but it was a cake that had sweets inside...yep a surprise for everyone. I used the layered cake idea for the Harry Potter Party but did my own decorations.

    For the layers I added food colouring to four cakes to get one for each house:

    Gryffindor – Red
    Hufflepuff – Yellow
    Ravenclaw – Blue
    Slytherin – Greeen

  2. My decorations for the cake were piped out of dark chocolate in the shape of Harry Potter’s glasses and also the scar on his forehead. I also used chocolate stars that were already made in the cake section of the supermarket.
    The dark chocolate that I piped to form the decorations on the Harry Potter Cake. I got the exact shapes from a printed download and copied that. Once done I put in the fridge to set.
    The dark chocolate that I piped to form the decorations on the Harry Potter Cake. I got the exact shapes from a printed download and copied that. Once done I put in the fridge to set.
    The chocolate decorations for the Harry Potter cake. I kept it simple.
    The chocolate decorations for the Harry Potter cake. I kept it simple.
    Finished Harry Potter cake all ready for the party.
    Finished the Harry Potter cake all ready for the party.


  3. Sorting Hat Cupcakes – I saw them online and had to give them a go. Make your cupcakes. Cut a bit out of the middle and put in a few coloured M&M’s (I used the ones that didn’t have peanuts in case of allergies). The colours need to match the houses in Harry Potter. I did have to stand for a while and separate the colours I needed from a big bag of M&M’s. Once you have put the secret M&M’s into the cupcake put the cake back on top and then ice it. Decorate and done. Now do it the rest of them and then all your sorting hat cupcakes are organised. I made sure that there was an even number of each colour. Below are the colours I needed for the sorting hat cupcakes and as said got only those colours in six cupcakes each. I made chocolate vegan cupcakes with very dark chocolate icing. The icing was just icing sugar, organic cocoa powder from the health food shop, and water. This icing is just like pure chocolate and perfect for anyone who cannot have butter or other ingredients.

    Gryffindor – Red
    Hufflepuff – Yellow
    Ravenclaw – Blue
    Slytherin – Greeen
     
  4. Wizard Bread – Fairy bread but these were stars and therefore more wizardry than normal fairy bread. I had fresh bread on the day of the party, and simply cut out star shapes with a cookie cutter. Once all done I put a little bit of butter on each star and decorated them with hundreds and thousands.
    Yummy Wizard Bread
    Yummy Wizard Bread
  5. Broomsticks  I got the idea from One Little Project and this can also be used for Halloween as well. All you need is straight pretzels, cheese sticks that are able to be created into the end of the broom (I used Bega Stringers as the cheese allows you to take the ends and turn them up to look like a straw broom), and then you need some chives to tie around the base of the cheese and pretzel to make it look like the tie holding the broom and the handle together.Making the broomsticks is rather fiddly so if you are like me there might be a few words said when they don’t go your way. You need to be extra careful when you push in the pretzel into the cheese.One tip that helps is to make a hole in the cheese to allow the pretzel to go in easily, however be careful as it might make the cheese break too.
    Some my first broomsticks that I made. Don't they look awesome!
    Some my first broomsticks that I made. Don’t they look awesome!


    More broomsticks.
    More broomsticks.
    Broomsticks all ready for the kids to eat them at the party.
    Broomsticks are all ready for the kids to eat at the party.


  6. Magic Wizard Chocolate – I saw this online ages ago and have used it for a few parties now. I have made it different by some things I used in the chocolate and of course naming it Magic Wizard Chocolate helped make it more special for the party.
    To create the magic wizard chocolate. Firstly purchase some dark chocolate or the chocolate of choice to melt. You will need a couple of packs as you need to melt the chocolate and lay it on a big tray. If you have a lot of chocolate you can make two trays. You will be amazed at how quickly this gets eaten. I chose dark-cooking chocolate and got three packs of the chocolate. You then need to have sweets to stick into the melted chocolate before it hardens. Feel free to add whatever you wish as it is up to you and the theme of your party. I chose eyes, bright candy, Kit-Kats, raspberries, and sprinkles. Once the chocolate has set (I helped it along by putting it in the fridge). All you need to do is break it into little pieces so that the kids can just take a bite-sized part and not a whole bit of it. The eyes help it look a bit spooky so will be a perfect party treat for Halloween, monsters, and of course a wizard party like Harry Potter.
  7. Lolly Snakes – I made sure to have snakes as one house is called Slytherin and a birthday party really has to have more sweets it seemed to make sense.
    Slytherin snakes for the kids... of course they are not real but lollies instead.
    Slytherin snakes for the kids… of course, they are not real but lollies instead.


  8. Magic Chocolate Frogs – In Harry Potter there are chocolate frogs that fly away. Mine were not like this and nearly all the frogs got eaten to never return on the day. Sad but they were very yummy.
    Magic Chocolate Frogs and Wizard Chocolate
    Magic Chocolate Frogs and Wizard Chocolate

I made sure that all food had labels that fit in with the theme of the party. This way everyone got involved in the fun.

The birthday girls excited to cut the cake.
The birthday girls are excited to cut the cake.

There was also a seat that had invisible cloaks for anyone who needed one. Yep I wore mine although no one knew due to it being invisible.

Some great tips and more inspiration to throw an amazing Harry Potter Party is listed in the BuzzFeed’s article on 33 cheap ways to organise an epic Harry Potter Halloween Party


I hope this gives you some great ideas for a Harry Potter Party or even Halloween.

Inside the Harry Potter Cake for the girls 9th Birthday Party.


FREE TAKEAWAY BELOW!

I’ve created a fabulous download for you. Harry Potter Cupcake Toppers. Perfect for your next party.

Originally published October 24 2017

Categories
Party ideas

Digger Birthday Cake

I loved this cake I made Alexander for his 2nd birthday – it is so easy to make. Your little one will love this fun digger birthday cake.

Do you have a construction mad person at home?
Are they having a birthday soon?

If you answered yes then this simple but effective cake might be something that is of interest.

How did I make this cake?

  • Firstly I made 2 cakes so that the diggers had the height for the rubble to be coming off the side of the cake
  • I made it easy and used a vanilla cake mix.
  • I then iced the outside of the cake with chocolate icing
  • I printed out a big number 2 so that I had the size and shape right and cut out the paper for a template.
    I then filled in the template area with the M&M’s or you can use smarties to create the number on top of the cake
  • To create the rubble on the side of the cake and in the diggers I used Violet Crumble and purchased a few bags to crush and have around the side of the cake
  • To make sure it is indeed a digger cake I added 2 diggers scooping up the Violet Crumble
  • You will need to have diggers for the decoration for this cake and some can be easily purchased online.

To get the most chocolatey icing
do the following

Get organic Cocoa Powder from the health food shop, then mix it with just icing sugar and a little water or maybe some juice (apple, orange or even just lemon juice is nice) This icing is like pure chocolate and is so yummy.


This cake is super easy to construct and decorate and looks fantastic. It was made for Alexander’s 2nd birthday. It is easily made for any birthday number, all you have to do is to change the number on top of the cake.

Alexander’s digger cake for his 2nd birthday

Sign up for my newsletter

Stay current with all the things that are happening on Mummy to Twins Plus One. Don’t miss a thing by signing up for my newsletter.

This post has affiliate links
Categories
Recipes

Make Mini Meat Pies

Would you like a super easy meat pie for your party? How about dinner or lunch? Or your Australia Day celebration?

Well, I have an easy recipe for you and it is very yummy too!

Preheat the oven: Heat the oven to 180°C or 356 °F

INGREDIENTS

  • 500 grams of beef mince (You can choose chicken, pork or turkey if you wish)
  • Frozen puff pastry sheets
  • 2 carrots grated
  • 2 big cups of chopped mushrooms
  • Soy Sauce – I added a sprinkle when cooking the mince
  • 2 spanish onions – finely cut
  • 1 brown onion – finely cut
  • 1 pack of Masterfoods Spicy Chilli Con Carne (this is used as sauce rather than a gravy)

METHOD

  • Take out 4 sheets of pastry to defrost
  • Cut up the onions and add them to the fry pan
  • Add the mince
  • Add the soy sauce
  • Add the grated carrot
  • Add the Spicy Chilli Con Carne sauce mix and then add the pouch with water to get all the sauce out and add to the sauce in the fry pan
  • Cook all ingredients until the water in the sauce has reduced a little but all as you need to have the sauce there to add to the mixture for the pie
  • Once all ingredients are cooked for the inside of the pie, turn off the fry pan
  • I used a muffin and friand tin to put my puff pastry in. I did find that the friand tin did it better. Also you will see that my pastry was not perfect and actually more rustic than I was hoping for.
  • Cut out a good square of pastry that will match the bottom and sides of the tin. I then pressed the pastry down to the bottom and the sides.
  • I then filled the pastry pie in the tin with the filling from the fry pan and finished off each individual pie with more pastry. This was measured by seeing if a big glass was a little bit bigger than the top of the pie width for each pie in the tin. I used a big gin glass to cut out a circle to then pinch closed on top of each indivual pie.
  • Bake for 30 minutes or until the pastry is very golden brown and looking crunchy.

I served the pies with a salad. It was very yummy and filling.

POST FEAST REVIEW

I thought that making pies would be easy and I was right. It really isn’t hard. However, I don’t really have a pie tin and made do with using a muffin and friand tin as a substitute. It worked out well with these tins but I did notice that the friand tin worked better.

The pastry was a bit clumsy and rustic but worked on the whole. A few pies had their bottom give out a little when I attempted to remove them from the tin.

I found that the pies were just the right size and a salad or vegetables for dinner. If you do decide to make this you can make a few different pies and then mix and match to have a few different ones on your dinner plate.

The pies were very tasty and the Spicy Chilli Con Carne sauce made it very tasty indeed as well as the chewy and melt in your mouth mushrooms.

I did read a few recipes but made it up as I went along, although this alarmed and annoyed my husband. He thought that I was following a recipe and got quite frustrated to learn I wasn’t. I then pointed out it was an experiment and he wasn’t cooking so it really didn’t matter.

WOULD I MAKE THIS AGAIN?

Yes, I would make this again. I think I need to get proper individual pie tins or make one big pie and have it as a slice of one pie for each person at dinner or lunch. It was rather quick and simple and for the remaining pies, I can have them in the fridge and just heat up for the next meal.

Sign up for my newsletter

Don’t miss a thing by signing up for my newsletter. This newsletter will list all giveaways and fabulous things that are happening. Stay current with all the things that are happening on Mummy to Twins Plus One.


This post has Affiliate Links

Categories
Party ideas

Adventure Time Party Prep

The kids have asked to have an Adventure Time themed birthday party this year. So of course I said yes. However then they both asked for a Lumpy Space Princess Cake. Have you seen Lumpy Space Princess? If you have you will know that she is an odd shape and not very easy to do in a cake. See image of LSP (Otherwise known as Lumpy Space Princess) below:

Lumpy Space Princess. Now you see what I mean about the odd shape. Of course the twins want a cake like this! I hope I can pull it off.

I have thought long and hard about the cake issue and the shape that LSP needs to be and wondered how to achieve it. I have concluded that the only way I can do it is with a whole bunch of cupcakes strategically positioned to look like LSP. I of course will have them with purple icing and one will have the yellow star and others with have the eyes and mouth. You get the idea. I have not practiced and plan to do it the day before the party. So that does not give me a lot of time. I’m being positive and I am seeing that all be fine… at least that is what I am telling myself.

Have you made a cake this shape before? Did you decide to do cupcakes and put it all together like I’m planning? Let me know.

So other than the cupcake birthday cake that I am going to create, what else am I going to serve for this party.

Food Ideas

  • Chips
  • Fairy bread
  • Dip with carrots, cucumber and crackers
  • Vegan chocolate cupcakes (these taste like mud cake and are so yummy)
  • Chocolate that has all sorts of sweets and eyes on it (it looks like it comes from the land of Adventure Time)
  • Fruit – Watermelon and Strawberries
  • I also have some sweets on offer that are standard at birthday parties and for the thank you bags

I also have 100% juice poppers and water for the kids as well.

Saw this online and had to give it a go. Step 1: Melt chocolate. Step 2: Pour chocolate onto baking paper. Step 3: Add decorations. Step 4: Wait for chocolate to dry and harden, then crack into little bits to serve for your party or as an addition to a cake. ‪#‎kids‬ ‪#‎partyfood‬ ‪#‎foundonline‬ ‪#‎birthdaypartyideas‬ ‪#‎kidsbirthday‬ ‪#‎twins‬ ‪#‎cooking‬ ‪#‎birthdayparty‬


Party Game Ideas

  • Princess Bubblegum says. I saw this on another website and it is just another variation on “Simon Says”. Instead of Simon you have Princess Bubblegum and she/he runs the game.
  • Scavenger Hunt or Quest. Place prizes around the park or yard and have clues to get to the next one. The last one is the biggest prize or just have a lot of little prizes to give everyone a little something.


I created 48 cupcakes today so that the kids could have a birthday celebration at school. Due to them being in different classes this meant double the cupcakes, however it will be nice that the kids have a moment to enjoy their birthday on their own in class.

Cupcakes all ready for school tomorrow.

Tomorrow I have a whole day of baking, tidying, and sorting things out to be ready for the party on Saturday. I will post a picture of the finished cake. All I can say is that I am sure it will be purple and of course lumpy. If it is exactly or more like the picture that will be a good effort, however we will see.

Have you been asked to make a weird shaped cake? Was it LSP? (Lumpy Space Princess) If so what did you end up creating? I would love to see photos.

If you would like to share your cake creations, please post the photos on Mummy to Twins Plus One Facebook Page.


Categories
3 years and beyond

Little Party Organisers

All of the girls birthday cakes

The girls are four in September, and for a while now they have been inviting everyone to their party.   As it is still July there is time to invite who we need to invite, but the girls are insisting we do it now!  Obviously very excited girls, let’s just hope that the party lives up to their expectations.  As a parent, I am just going to do a nice party of family and friends, party games, party food, and kids playing is enough for a fourth birthday celebration.

I have had some orders for the cake, it must be pink and there was a fairy princess to be on the cake at some point. Not sure, but we will see what we can organise. I am thinking that it might be a nice idea to do the number four, and decorate with pink icing, and flowers, maybe a princess? Who knows?  Depends on how hard it all is to do, then maybe have some cupcakes for the kids as they will be easier to handle.

As the girls are now older, they want to become more involved in their party, which is good, and at times I think a bad thing. The good part is that they are putting their personality into their party and having some input into their day, the bad part is that what mummy and daddy wanted to do might be not right in their eyes. My opinion is that we do a bit of what the girls want within reason and we do what we can and afford to do. It is a party and I don’t want to break the bank to do it that would just be silly. Even if we could, we couldn’t as we don’t have a lot of money so a simple party is the way to go and the only way we can go.

I know I said it would be a simple party, but simple parties can be stylish, fun and just the thing for the kids. Now I just need to design the invite, get the guest list (Have to check with the girls who they want to come) organise some party games, and pray for good weather – the party is going to be in a park so good weather is essential.

Do your kids help with organising their birthday party? Do they get super excited and invite everyone they meet? Mine do.  I don’t want to complicate things as we have done very nice cakes for their three other birthdays (check out the images of the cakes from other birthdays) , so would like to have something nice looking but simple.  What have you planned for your child’s birthday? Anything fancy or keeping it simple? Send in your comments.

Why not continue this discussion on our facebook page – http://www.facebook.com/Mummy2twinsblog

Just wanted to thank the girls grandma for helping with their birthday cakes, they do look wonderful, and the girls just loved them.  Hope this years creation will be just loved.