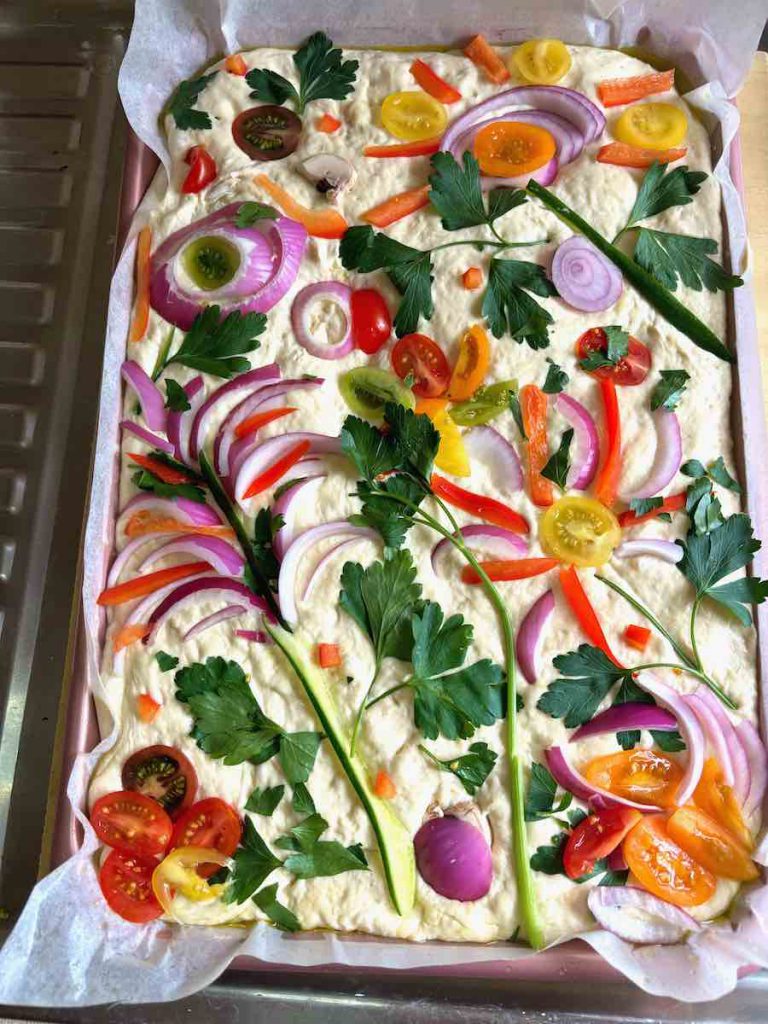
Categories
Recipes

Knead Some Creativity? Make Stunning Focaccia Designs

Why settle for plain bread when you can bake a garden? This focaccia recipe is your ticket to creating a delicious masterpiece that’s as stunning as it is scrumptious. With simple ingredients, a little patience, and a sprinkle of creativity, you’ll craft a loaf that’s golden, crispy, and blooming with veggie “flowers.” Let’s turn your kitchen into an edible art studio!

INGREDIENTS

  • 4 cups “00” flour or bread flour if you don’t have 00 flour
  • 1 tsp salt 
  • 2 cups warm water 
  • 2 tsp dry instant yeast 
  • 1 tsp sugar 
  • ½ cup olive oil 

For decoration:

  • Capsicum, cherry tomatoes, cucumber, red onion, mushrooms, or whatever veggies spark your creativity!
  • Parsley, you can add other herbs if you like, for example, rosemary, chives, or basil.

I sourced all my fresh ingredients from Todarello’s Katoomba Village Fruit Market, a true gem for any home chef. Their vibrant displays of produce are a feast for the eyes, with fruits and vegetables so fresh they practically glow with flavour. From crisp capsicums to fragrant herbs, everything I needed for my focaccia garden was right at my fingertips.

Todarello’s Katoomba Village Fruit Market

Parsley

Red onions

Green and red capsicums

METHOD

NOTE: Preheat your oven to 200°C/390°F

Mixing the Magic: Creating the Dough

1. Awaken the Yeast

Combine warm water, sugar, and yeast in a bowl. Make sure the water is just the right temperature—like a baby’s bath. Let it rest until it gets foamy and bubbly, like a tiny science experiment.

The dough rising in the garden as the kitchen was a bit cold

2. Stir It Up

In a large bowl, mix your flour and salt. Slowly add the foamy yeast mixture and a tablespoon of olive oil. Stir until it turns into a sticky, thick dough. Drizzle on a bit more olive oil, coat your hands, and gently roll the dough around in the bowl. Cover with plastic wrap—it’s nap time for your dough.

Watch It Grow: Letting the Dough Rise

Put the covered bowl in a warm, cozy spot and let the dough rise for about an hour or until it doubles in size. Give it a gentle fold, drizzle more olive oil, and if you’ve got the patience, let it rest overnight in the fridge. This slow rise will give your focaccia a flavour boost that’s worth the wait.

3. Build Your Bread Garden

Spray a deep baking dish with nonstick spray and add a generous layer of olive oil. Tip the dough into the pan and gently stretch it to the corners, dimpling it with oiled fingers. Now, channel your inner artist! Use sliced capsicum as petals, cherry tomatoes for bold pops of colour, and fresh herbs for stems. Sprinkle flaky sea salt on top for the perfect finish.

Ready to go into the oven – looking so bright and colourful

4. Bake and Admire Your Work

Bake your creation for 30–40 minutes. The bread should be golden brown, crispy on the outside, and sound hollow when tapped. Let it cool for a few minutes in the pan before transferring to a wire rack.

Cooked and ready to eat, looks so yummy!

5. Slice, Serve, and Savour

Your focaccia garden is ready to shine! Whether you’re impressing friends or just spoiling yourself, this edible beauty is guaranteed to wow. Don’t forget to snap a pic, soak up all those compliments, and revel in the delicious fruits (or flowers) of your labour. Who knew baking could be this much fun—and this gorgeous?

The crust and the cooked tomatoes looking delicious

POST FEAST REVIEW

As a newcomer to focaccia making, I was honestly impressed that my bread looked and tasted just like store-bought focaccia—and it really wasn’t that hard to make! But I think the real art is in making it taste authentic. While I did capture some of those classic focaccia flavours, I added my own modern twist with vegetables on top. They might not be traditional, but they were tasty and added a unique touch.

WOULD I MAKE THIS AGAIN?

Yes, I would make focaccia again. I have never made focaccia before, and I’m absolutely taken with how you can really make it your own! While it’s still focaccia, the toppings and design completely transform it into something unique—truly a work of art. It’s amazing how a simple loaf of bread can turn into a personalised creation. Now, I’m eager to perfect the traditional flavours of focaccia and experiment with different variations. It’s such a fun and rewarding experience, and I can’t wait to bake more delicious batches in the future!

SIGN UP FOR MY NEWSLETTER

Don’t miss a thing by signing up for my newsletter. The newsletter will list all giveaways and fabulous things that are happening. Stay current with all the things that are happening on Mummy to Twins Plus One.


Categories
Recipes

Craving Something New? Try This Blackberry, Fetta, and Sweet Chilli Pizza

I was lucky enough to receive a pizza stone from Santa this year, and I couldn’t wait to try it out in my oven to see if I could capture some of the magic of a wood-fired pizza… or at least come close. To make it all work, I picked up a pizza peel—a handy flat paddle with a handle for sliding pizzas in and out of the oven. After binge-watching dough-making and pizza documentaries on Netflix and MasterClass, I thought, why not give it a shot?

The finished Blackberry, Fetta, Sweet Chilli, Rocket, and Pistachio Pizza

A different and stylish pizza –
Blackberry, Fetta, Sweet Chilli, Rocket, and Pistachio Pizza
The crust looks so tasty, don’t you think!

Blackberry, Fetta, Sweet Chilli, Rocket, and Pistachio Pizza

While watching the documentaries on pizza making, I started thinking about unique topping combinations that might work well together. The chefs featured in the shows were experimenting with all kinds of creative ingredients, and one pairing, in particular, caught my attention. Inspired by their bold approach, I came up with the idea for a blackberry, feta, sweet chilli, pistachio, and rocket pizza.

I loved the thought of blending the sweetness and slight tanginess of blackberries with the saltiness of feta cheese, all balanced by the zing of a sweet chilli sauce. To add some crunch and earthiness, I finished it off with pistachios, and the fresh rocket brought a peppery, bright touch to tie it all together. It was a bit of an experiment, but the flavours came together beautifully.

The blackberries paired surprisingly well with the sweet chilli sauce, and the feta, pistachios, and rocket added the perfect mix of savoury, crunch, and freshness. It was definitely a departure from a traditional pizza, but it turned out to be an absolute winner!

I stumbled across the Forno Piombo dough recipe and method and thought, “Why not give that a go?” I hoped I could replicate that perfect wood-fired crust, even though I was using a conventional oven. While I didn’t quite achieve the desired wood-fired pizza effect, the outcome was still excellent—the crust was crunchy, and the base was incredibly tasty!

Blackberries, sweet chilli sauce, fetta and rocket with the pizza peel

Preheat your pizza stone in the oven at the highest temperature possible—unless you’re using a wood-fired pizza oven. A hot stone ensures your pizza cooks faster and more efficiently.

TIP: To make sure your pizza doesn’t stick to the peel, use semolina flour! Its coarse texture keeps things sliding smoothly. No semolina? Regular flour works too, but semolina’s non-stick powers can’t be beat!

INGREDIENTS

To make the dough

  • 4 cups of flour (I used “00” flour)
  • ¼ tsp of instant dry yeast
  • 2 teaspoons of salt
  • 1 ½ cups of warm water
  • Semolina flour ensures the pizza doesn’t stick to the pizza peel. (You will only need a bit to sprinkle on the peel).

Topping

  • 1 punnet of blackberries
  • Fetta
  • Sweet Chilli Sauce for the base
  • Rocket
  • Pistachios
Blackberries at Todarello’s Katoomba

The blackberries came from Todarello’s Katoomba Village Fruit Market. I enjoy going to Todarello’s because of the wide range of fresh fruits and vegetables they have. The vibrant colours create such a visually stunning atmosphere, and it’s a great place to wander and find inspiration for your next food creation.

Blackberries and strawberries

MAKING THE DOUGH

  • In a bowl, combine the water, yeast, and flour using a fork—no mixer is needed to make this dough (but feel free to use one if you prefer).
  • Let the dough rest for 30 minutes.
  • Sprinkle the salt over the dough and mix it in.
  • Allow the dough to rest for another 30 to 60 minutes.
  • Carefully lift the dough, letting it stretch without tearing.
  • Gently fold or twist the dough back into a ball shape.
  • Let the dough rest again for 30 to 60 minutes.
  • Repeat the stretching and folding process 2-3 times until the dough is smooth.
  • Divide the dough into 3–4 portions, placing each one in a lightly oiled bowl. I weighed each portion to ensure they were equal, resulting in 3 portions of 300 grams each.
  • I prepared the dough a day before making the pizzas, covering the bowls with cling wrap and storing them in the fridge.
  • When I was ready to use the dough, I placed the bowls in a warm spot to bring it to room temperature, allowing the dough to continue rising.
  • You can make the pizza on the same day by allowing the dough to rise and covering it for 3–6 hours. If you prefer, store the dough balls in the fridge and use them within 72 hours. The longer they rest, the more the flavour develops.
Tipo “00” Extra Fine Flour
3 portions of dough ready to go into the fridge

CREATING THE PIZZA

  • Roll the dough out to be a circle
  • Add the Sweet Chilli Sauce to the base of the pizza
  • Add the Fetta
  • Add the blackberries
  • Once cooked add the rocket and pistachios
  • Eat and enjoy
Fetta cut up ready for the pizza
Adding the Sweet Chilli Sauce to the base

Cooking times

Cooking times can vary depending on your oven. If you’re using a conventional oven, it will likely take around 15 minutes. Be sure to check that the pizza is cooked through, with a golden crust and toppings that look done. Keep an eye on your pizza and take it out as soon as it’s done. If you have a wood-fired pizza oven, you can cook your pizzas in record time – as little as 5 minutes or less. For example, the Blackberry, Fetta, Sweet Chilli, Rocket, and Pistachio Pizza took longer to cook, but once I turned the oven up to full capacity, it was ready in about 10 minutes. Initially, it was in the oven for around 30 minutes. On the other hand, the pepperoni and ham and cheese pizzas cooked quicker, around 15 minutes. My oven was set to 260°C. It all depends on your oven’s temperature. While the cooking time was longer for some pizzas, the taste and quality were exceptional.

Since I had some extra dough left over, I decided to make a few more pizzas that were more traditional.

Pepperoni Pizza
Next, I made a classic pepperoni pizza with a standard tomato sauce base and gooey mozzarella cheese. A timeless favourite, it was comforting and satisfying as always.

Pepperoni Pizza

Ham and Cheese Pizza
Finally, I kept it simple with a ham and cheese pizza. Sometimes, less really is more, and this one hit the spot with its straightforward, cheesy deliciousness.

Ham and Cheese Pizza

One thing I learned: my oven is very slow. I had to crank it up hotter than usual, and a few pizzas took longer than expected to cook. But by the last one, I’d figured out the sweet spot—it baked perfectly in about 15 minutes. All in all, it was a fun experiment, and the results were delicious!

POST FEAST REVIEW

I was initially a bit apprehensive when some of the recipes called for different types of dough, malt, and a sourdough starter – it all seemed too complicated. However, after some searching, I found a simple dough recipe that was easy to follow, and soon I was ready to make some delicious pizzas! I had never tried the combination of Blackberry, Fetta, Sweet Chilli, Rocket, and Pistachio Pizza before, and honestly, I wasn’t sure how it would turn out. There’s always a difference between imagining an idea and bringing it to life, but when it works, it’s incredibly rewarding. In the end, the pizza turned out wonderfully. The flavours blended perfectly, and it was incredibly tasty. The dough was a big hit – it created a crisp, golden crust that held all the toppings beautifully. It was a true success!

WOULD I MAKE THIS AGAIN?

Yes, I would make a few adjustments next time. I’d consider taking the time to prepare a sourdough base, as I think it could elevate the pizza even more. I’d also be more selective with the type of fetta, ensuring it’s creamy enough to melt evenly throughout the pizza. If I were to make this again, I’d try it at a friend’s place with a wood-fired pizza oven to see if the blackberries and feta melt more consistently. Additionally, I’d experiment with the sauce to achieve the perfect balance of spice that complements the rocket and the salty richness of the fetta.

SIGN UP FOR MY NEWSLETTER

Don’t miss a thing by signing up for my newsletter. The newsletter will list all giveaways and fabulous things that are happening. Stay current with all the things that are happening on Mummy to Twins Plus One.