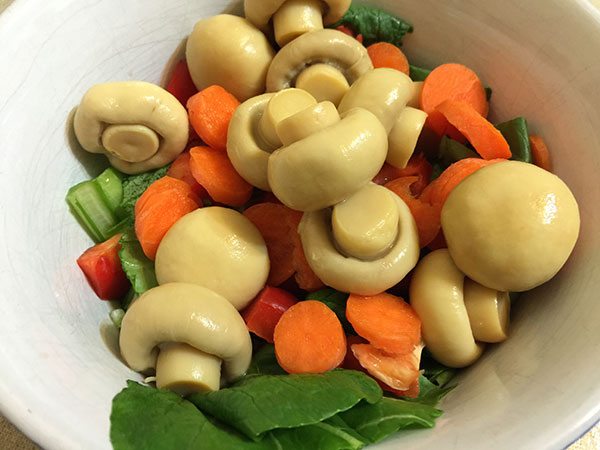
Would you like to make a really simple and easy dinner?
A dinner that is also healthy as well?
How about super yummy too?
Make this yummy warm chicken salad with veggies. It is such a quick and easy meal to make for dinner.
Ingredients
A pack of fresh salad leaves – I purchased a fresh mixed leaf pack from Woolies. In the salad mix was also to the carrot.
Mushrooms
Broccoli
Beans
Capsicum
500 grams of Chicken
Soy Sauce
Chilli Flakes
Birch and Waite Thai, Lime and Coriander Dressing.
The super tasty and yummy Birch & Waite Thai , Lime and Coriander Dressing.
Adding the Birch & Waite Thai , Lime and Coriander Dressing to the salad leaves. I did this before I put the chicken and veggies in with the salad leaves.
Method
Cook the vegetables first. I cut up the mushrooms, beans, broccoli, capsicum and added them to a fry pan. In the fry pan I put some olive oil.
The vegetables cooked for about 10 – 15 mins in a very hot fry pan. This allowed them to get some colour and to be cooked through without being to overdone.
I added some soy sauce to the mixture to create some flavour for the veggies.
I sprinkled in a little bit of chilli flakes to have a little spice and taste.
Once the veggies were done I removed them from the pan. They stayed in a bowl to then allow me to cook the chicken.
I added some more olive oil to make sure that the chicken did not stick. The pan still had the flavours of the soy sauce and the chilli flakes. This made the chicken get a nice brown coating on the outside.
Once the chicken was cooked I added the veggies back to the pan.
I got a bowl to add the salad leaves to. I poured in the Birch and Waite Thai, Lime and Coriander Dressing all over the leaves. I did not add the whole bottle but just enough to coat the leaves and give the taste of the dressing throughout the salad.
Now add the chicken and veggies to the bowl with the salad leaves and mix around.
Serve and enjoy this tasty, yummy and healthy salad.
The finished product! The warm chicken and veggie salad is ready to eat.
I hope you enjoy this meal as much as we did. Hubby and I managed to finish the whole bowl of salad between us.
If you don’t eat meat you can add more vegetables, tofu or other items to make it a veterinarian option. You can also play around with ingredients and maybe use fish or beef with your next salad creation.
Sign up to my newsletter
Do you wish to stay current with all the things that are happening on Mummy to Twins Plus One? Don’t miss a thing by signing up to my newsletter. This newsletter will list all giveaways and fabulous things that are happening.
I was lucky enough to receive a pizza stone from Santa this year, and I couldn’t wait to try it out in my oven to see if I could capture some of the magic of a wood-fired pizza… or at least come close. To make it all work, I picked up a pizza peel—a handy flat paddle with a handle for sliding pizzas in and out of the oven. After binge-watching dough-making and pizza documentaries on Netflix and MasterClass, I thought, why not give it a shot?
Glazed PIzza Stone from SantaSo happy that Santa gave me a Glazed Pizza StonePizza Spatula or Pizza PeelMatador Pizza Spatula
The finished Blackberry, Fetta, Sweet Chilli, Rocket, and Pistachio Pizza
A different and stylish pizza – Blackberry, Fetta, Sweet Chilli, Rocket, and Pistachio Pizza
The crust looks so tasty, don’t you think!
Blackberry, Fetta, Sweet Chilli, Rocket, and Pistachio Pizza
While watching the documentaries on pizza making, I started thinking about unique topping combinations that might work well together. The chefs featured in the shows were experimenting with all kinds of creative ingredients, and one pairing, in particular, caught my attention. Inspired by their bold approach, I came up with the idea for a blackberry, feta, sweet chilli, pistachio, and rocket pizza.
I loved the thought of blending the sweetness and slight tanginess of blackberries with the saltiness of feta cheese, all balanced by the zing of a sweet chilli sauce. To add some crunch and earthiness, I finished it off with pistachios, and the fresh rocket brought a peppery, bright touch to tie it all together. It was a bit of an experiment, but the flavours came together beautifully.
The blackberries paired surprisingly well with the sweet chilli sauce, and the feta, pistachios, and rocket added the perfect mix of savoury, crunch, and freshness. It was definitely a departure from a traditional pizza, but it turned out to be an absolute winner!
I stumbled across the Forno Piombo dough recipe and method and thought, “Why not give that a go?” I hoped I could replicate that perfect wood-fired crust, even though I was using a conventional oven. While I didn’t quite achieve the desired wood-fired pizza effect, the outcome was still excellent—the crust was crunchy, and the base was incredibly tasty!
Blackberries, sweet chilli sauce, fetta and rocket with the pizza peel
Preheat your pizza stone in the oven at the highest temperature possible—unless you’re using a wood-fired pizza oven. A hot stone ensures your pizza cooks faster and more efficiently.
TIP: To make sure your pizza doesn’t stick to the peel, use semolina flour! Its coarse texture keeps things sliding smoothly. No semolina? Regular flour works too, but semolina’s non-stick powers can’t be beat!
INGREDIENTS
To make the dough
4 cups of flour (I used “00” flour)
¼ tsp of instant dry yeast
2 teaspoons of salt
1 ½ cups of warm water
Semolina flour ensures the pizza doesn’t stick to the pizza peel. (You will only need a bit to sprinkle on the peel).
Blackberries ready for the pizzaBlackberries looking very tasty
Topping
1 punnet of blackberries
Fetta
Sweet Chilli Sauce for the base
Rocket
Pistachios
Blackberries at Todarello’s Katoomba
The blackberries came from Todarello’s Katoomba Village Fruit Market. I enjoy going to Todarello’s because of the wide range of fresh fruits and vegetables they have. The vibrant colours create such a visually stunning atmosphere, and it’s a great place to wander and find inspiration for your next food creation.
Blackberries and strawberries
Todarello’s Katoomba Village Fruit MarketBlackberries at Todderlo’s Katoomba
MAKING THE DOUGH
In a bowl, combine the water, yeast, and flour using a fork—no mixer is needed to make this dough (but feel free to use one if you prefer).
Let the dough rest for 30 minutes.
Sprinkle the salt over the dough and mix it in.
Allow the dough to rest for another 30 to 60 minutes.
Carefully lift the dough, letting it stretch without tearing.
Gently fold or twist the dough back into a ball shape.
Let the dough rest again for 30 to 60 minutes.
Repeat the stretching and folding process 2-3 times until the dough is smooth.
Divide the dough into 3–4 portions, placing each one in a lightly oiled bowl. I weighed each portion to ensure they were equal, resulting in 3 portions of 300 grams each.
I prepared the dough a day before making the pizzas, covering the bowls with cling wrap and storing them in the fridge.
When I was ready to use the dough, I placed the bowls in a warm spot to bring it to room temperature, allowing the dough to continue rising.
You can make the pizza on the same day by allowing the dough to rise and covering it for 3–6 hours. If you prefer, store the dough balls in the fridge and use them within 72 hours. The longer they rest, the more the flavour develops.
Tipo “00” Extra Fine Flour
3 portions of dough ready to go into the fridge
CREATING THE PIZZA
Roll the dough out to be a circle
Add the Sweet Chilli Sauce to the base of the pizza
Add the Fetta
Add the blackberries
Once cooked add the rocket and pistachios
Eat and enjoy
Fetta cut up ready for the pizza
Adding the Sweet Chilli Sauce to the base
Cooking times
Cooking times can vary depending on your oven. If you’re using a conventional oven, it will likely take around 15 minutes. Be sure to check that the pizza is cooked through, with a golden crust and toppings that look done. Keep an eye on your pizza and take it out as soon as it’s done. If you have a wood-fired pizza oven, you can cook your pizzas in record time – as little as 5 minutes or less. For example, the Blackberry, Fetta, Sweet Chilli, Rocket, and Pistachio Pizza took longer to cook, but once I turned the oven up to full capacity, it was ready in about 10 minutes. Initially, it was in the oven for around 30 minutes. On the other hand, the pepperoni and ham and cheese pizzas cooked quicker, around 15 minutes. My oven was set to 260°C. It all depends on your oven’s temperature. While the cooking time was longer for some pizzas, the taste and quality were exceptional.
The crust and toppiing looks fabulous on the Blackberry, Fetta, Sweet Chilli, Rocket, and Pistachio PizzaBlackberry, Fetta, Sweet Chilli, Rocket, and Pistachio Pizza
Since I had some extra dough left over, I decided to make a few more pizzas that were more traditional.
Pepperoni Pizza Next, I made a classic pepperoni pizza with a standard tomato sauce base and gooey mozzarella cheese. A timeless favourite, it was comforting and satisfying as always.
Pepperoni Pizza
Ham and Cheese Pizza Finally, I kept it simple with a ham and cheese pizza. Sometimes, less really is more, and this one hit the spot with its straightforward, cheesy deliciousness.
Ham and Cheese Pizza
One thing I learned: my oven is very slow. I had to crank it up hotter than usual, and a few pizzas took longer than expected to cook. But by the last one, I’d figured out the sweet spot—it baked perfectly in about 15 minutes. All in all, it was a fun experiment, and the results were delicious!
POST FEAST REVIEW
I was initially a bit apprehensive when some of the recipes called for different types of dough, malt, and a sourdough starter – it all seemed too complicated. However, after some searching, I found a simple dough recipe that was easy to follow, and soon I was ready to make some delicious pizzas! I had never tried the combination of Blackberry, Fetta, Sweet Chilli, Rocket, and Pistachio Pizza before, and honestly, I wasn’t sure how it would turn out. There’s always a difference between imagining an idea and bringing it to life, but when it works, it’s incredibly rewarding. In the end, the pizza turned out wonderfully. The flavours blended perfectly, and it was incredibly tasty. The dough was a big hit – it created a crisp, golden crust that held all the toppings beautifully. It was a true success!
WOULD I MAKE THIS AGAIN?
Yes, I would make a few adjustments next time. I’d consider taking the time to prepare a sourdough base, as I think it could elevate the pizza even more. I’d also be more selective with the type of fetta, ensuring it’s creamy enough to melt evenly throughout the pizza. If I were to make this again, I’d try it at a friend’s place with a wood-fired pizza oven to see if the blackberries and feta melt more consistently. Additionally, I’d experiment with the sauce to achieve the perfect balance of spice that complements the rocket and the salty richness of the fetta.
SIGN UP FOR MY NEWSLETTER
Don’t miss a thing by signing up for my newsletter. The newsletter will list all giveaways and fabulous things that are happening. Stay current with all the things that are happening on Mummy to Twins Plus One.
A gorgeous slice of Dark Chocolate Raspberry Oreo Crust Tart – You want it don’t you!
Dark chocolate and raspberries, side by side, Met on a crisp Oreo base, with nothing to hide. One whispered, “I’m rich, I’m smooth, I’ll thrill,” The other replied, “I’m tart and sweet, let’s chill!”
Together they danced, a perfect embrace, Melding flavours, setting hearts to race. With a twist of the crust, their love was complete, And that’s how this tart became the ultimate treat!
This stunning dessert is super simple to make, looks impressive, and is sure to wow everyone. Find out how to whip up this fabulous tart!
Looks so yummy and ready to eat!
Note: This is a no-bake recipe where everything sets perfectly in the freezer and fridge—no fuss, just deliciousness! Perfect for the busy holiday season or anytime you need a quick treat.
ITEMS YOU NEED
Tart pan – I used one with a removable bottom, which makes it much easier to lift the tart out. You can use a different pan, but it might be a bit trickier.
Blender/food processor – Perfect for crushing the Oreo cookies and pureeing the raspberries smoothly.
Grater – I used it to finely grate the dark chocolate for a decorative touch on top of the tart.
Getting ready to make a dark chocolate raspberry tart with an Oreo crust.
INGREDIENTS
4 punnets of raspberries:1 for the filling, 1 for the purée topping, and 2 for decorating the tart.
45 Oreo Cookies (about 3–4 packs). I originally planned to use fewer cookies, but my tart pan needed extra coverage. If you’re using a smaller pan, you can reduce the quantity accordingly.
90 grams of butter
300 ml of whipping cream
400 grams of dark chocolate
Raspberries are so delicious and in season, perfect for a dessert with dark chocolate.
Raspberries at Todarello’s Katoomba Village Fruit MarketRaspberries ready to be made into a dark chocolate raspberry Oreo tart
Todarello’s Katoomba Village Fruit Market looks bright and colourful.
I purchased my fresh raspberries from Todarello’s Katoomba Village Fruit Market, and it’s truly a treasure trove of fresh and fabulous produce! From vibrant fruits to crisp veggies, their selection is simply stunning. Plus, their customer service is outstanding. Need help getting your goodies to the car? Just ask, and their friendly staff will happily assist.
These raspberries look so delicious.
I absolutely love shopping at Todarello’s—it’s a feast for the eyes with all the bright, colorful displays. Everything you could possibly want is right there, making every visit a delightful experience!
Summer’s Sweetest Treat: Raspberries Are in Season!
Raspberries are at their peak this summer, bursting with flavour and brimming with health benefits. These vibrant berries are rich in antioxidants, helping to fight free radicals and support anti-aging, and they’re packed with vitamin C to keep your skin radiant and healthy.
And let’s not forget dark chocolate—it’s not just indulgent but also good for you in moderation! Loaded with antioxidants and linked to heart health, dark chocolate makes the perfect partner for raspberries.
This tart is the ultimate way to enjoy the best of both worlds. It’s a delicious dessert that also helps you get your dose of summer’s sweetest fruit and a touch of heart-healthy indulgence!
METHOD
Step 1: Crafting the Oreo Tart Crust (Feel free to swap the Oreo crust for a classic pastry base, homemade or store-bought.) Start by crushing the Oreo cookies in a blender or food processor—you may need to work in batches. Once crushed, the cookies should resemble fine crumbs, almost like edible dirt (but much tastier!). Transfer the crumbs to a bowl, melt the butter, and mix it into the crumbs until they form a sticky dough.
The Oreo Cookies all ready to become the tart crust.
Step 2: Preparing and Shaping the Crust Lightly grease the tart pan with a touch of butter to ensure the crust doesn’t stick and releases easily. Press the Oreo dough into the pan, smoothing it out to create an even layer along the bottom and up the sides. Take care to ensure the crust is consistent throughout—this will help it hold together when sliced and prevent crumbling.
Oreo Crumbs/dirt ready to form the tart crustMelted butter was added to the Oreo CrumbsOreo crust pressed into pan and ready to set in the freezer and fridge
Step 3: Setting the Crust Once the crust is pressed into the tart pan, it needs time to set. Place the pan in the freezer for 10 minutes to firm up. After that, transfer it to the fridge to keep it chilled until you’re ready to add the filling.
Step 4: Creating the Filling In a mixing bowl, combine 300ml of whipping cream, melted dark chocolate, and the purée from 1 punnet of raspberries. Stir until the mixture is smooth, well-blended, and starts to thicken. Once ready, pour the luscious filling into the prepared tart crust, spreading it evenly.
Delicious dark chocolate.
Mixing the filling The filling in the tart pan before the raspberry puree topping The tart setting in the fridge with the raspberry puree topping
Step 5: Crafting the Raspberry Purée Topping Blend 1 punnet of raspberries until silky smooth. Pour the purée into a jug or directly onto the tart, spreading it gently over the chocolate filling. For a thicker, more decorative effect, reduce the purée slightly before adding it. Whether it’s a vibrant pattern or a rich additional layer, this raspberry topping perfectly complements the dark chocolate.
What a stunning dark crust the Oreo Cookies give this tart.
Step 6: Setting the Tart Allow the tart to chill in the fridge for at least 3 hours to set properly. Make sure it’s firm and no longer wobbly—if it still jiggles, give it a bit more time to chill. For best results, you can let it set overnight, which works perfectly without altering the final texture. I let this tart chill overnight for an effortless finish.
Dark Chocolate Raspberry Oreo Crust Tart.
Step 7: Decorations As the tart sets, get creative with your decorations! You can top it with more fresh raspberries, a handful of nuts, shaved chocolate, molded chocolate decorations, or even a scoop of ice cream for an extra indulgent touch.
Side view of the Dark Chocolate Raspberry Oreo Crust Tart.
Just check out the filling and how the chocolate and raspberries make you want to have a bite.
The grated dark chocolate creates a great visual for this slice and also adds more texture.
This dessert is incredibly simple to make and doesn’t require much hands-on time. It took me about an hour to prep everything, and the fridge did the rest. Plus, no baking? That’s a treat in itself!
I hope you enjoy making this tart as much as I did. Why not get creative with different decorations—pine nuts, pistachios, toasted almonds, or even more raspberries to fill the entire tart? You could also try adding dark chocolate decorative moulds to give it an extra special touch. Have fun with it and make it your own.
POST FEAST REVIEW
I was genuinely surprised at how simple this recipe turned out to be! It might look fancy, but trust me, it’s not. Just whip up the crust, mix the filling, add the topping, and let the fridge work its magic. Once it’s set, go wild with the decorations, and you’re ready to serve. Easy, right?
Next time, I might try a traditional pastry base or even a store-bought one to see how it affects the flavour and prep time. You could also experiment with different biscuit bases for your own unique twist. That said, this tart was an absolute hit! It disappeared in record time, with everyone raving about the velvety smooth dark chocolate perfectly balanced by the tart zing of raspberries—a match made in dessert heaven.
And can we take a moment to appreciate that Oreo cookie crust? Not only was it ridiculously easy to make, but the deep dark base also made the vibrant red raspberries pop like a work of art. Total showstopper!
WOULD I MAKE THIS AGAIN?
Absolutely, I’d definitely make this again—it was a huge hit in my house! Next time, I’d opt for individual tarts instead of one large one, as it makes for a more convenient, bite-sized treat. That way, you can simply enjoy a small tart without needing to slice it up. This dessert is incredibly easy to make and perfect for dinner parties, birthdays, holidays, or any special occasion.
SIGN UP FOR MY NEWSLETTER
Don’t miss a thing by signing up for my newsletter. The newsletter will list all giveaways and fabulous things that are happening. Stay current with all the things that are happening on Mummy to Twins Plus One.
I love easy recipes and ones that are yummy and work well.
I found it hard to find a vanilla cake mug pack from the supermarkets so played around with the cake mix I already had. The reason for wanting vanilla, or as my little boy used to call it, white cake, is due to the fact that he doesn’t like chocolate at all and therefore needs to have vanilla cake. Previously I created this microwave mug cake with a vanilla mix and it worked well.
The one that I have created here is for a chocolate cake but it will work with any cake mix, as I was all out of vanilla cake mix.
INGREDIENTS
4 Tablespoons of cake mix
3 Tablespoons of milk
1 Tablespoon of oil
Add icecream or cream – optional addition for after it is cooked
METHOD
Add all ingredients to the mug
Mix together
Add sprinkles if you wish – we did and it tasted great. (This step is optional)
Cook in the microwave for 1 minute and 40 seconds.
Add ice cream or cream to the mug and enjoy our moist, yummy and tasty microwave mug cake.
SIGN UP FOR MY NEWSLETTER
Stay current with all the things that are happening on Mummy to Twins Plus One. Don’t miss a thing by signing up for my newsletter. This newsletter will list all giveaways and fabulous things that are happening.
I was sent a Philips Airfryer XXLto test out. Read on to learn how to cook hot chips and lamb chops & veggies in the airfryer.
Insert happy dance here. I do like getting lovely presents that can help the family, and especially me.
A big and huge thank you to Philips for this amazing gift.
Previous to getting an email about this wonderful airfryer I really hadn’t heard about them. Yes, I was in the dark about the world of airfrying. The airfyer is a healthier way to cook.
Healthiest way to fry* Twin TurboStar technology makes great-tasting fried food with the least amount of fat.**
XXL family size 1.4 kg capacity is large enough for a whole chicken or six portions of fries for the whole family.
Automatic settings 5 preset programs & Keep Warm mode — with digital display and QuickControl dial.
Easy to clean QuickClean basket & non-stick drawer wash up in 90 seconds — or pop them in the dishwasher.
So what is an airfryer?
Twin TurboStar technology combines with 2225 watts of power for effective fat removal. A ‘tornado’ of hot air melts away fat — capturing it all in the bottom of the Airfryer XXL for easy disposal. *Based on the fat content of chicken and pork compared to deep-fat frying and wok frying. The airfryer circulates hot air at high speed, and in turn, cooks the food. Food is crispy outside and tender on the inside. The Philips Airfryer can grill, fry, bake and roast.
How to make chips in the Philips Airfyer XXL
You might be surprised that making hot chips is rather simple. Ingredients:
6 potatoes
Oil of choice
Preparation time: 30 minutes, this includes cutting up potatoes and soaking the chips for 20 minutes.
Method:
I cut up 6 potatoes. I like to keep the skin on and therefore just washed them to take the excess dirt of them.
Once cut up they had to be soaked in water for 20mins.
After they have had their 20min bath, the chips need to be dried. You can either use a tea towel or a paper towel. I chose to use a tea towel.
Put the chips in a bowl with 1 tablespoon of oil.
Mix the oil around so that all the chips get coated in the oil.
Put all the chips in the airfyer basket. Make sure to do this by hand and to not tip them from the bowl into the tray. The airfyer does not like oil spilled in the try and therefore might have a negative outcome for the chips and machine if you do this.
Once in the basket, the chips are ready to be cooked.
Select the chips preset, make sure it on for 180 degrees Celsius and select 25 minutes for the cooking time.
At various times throughout cooking the chips stop the airfyer and move the chips around. This makes sure that they are all cooking well.
You will see the different times that you stop and stir the chips just how fast they are cooking.
Once all cooked, you can now enjoy yummy and healthy hot chips.
Yummy hot chips that I made with the Philips Airfryer XXL. They were so tasty and quick to make. Plus healthy as well.
Lamb Chops and Vegetables cooked with the Airfryer
Hubby decided he wanted to have a go of the new airfryer. He cooked the below meal and found the airfryer so easy to use.
Happy and cooking dinner with the Philips Airfryer XXL
Ingredients:
4 Lamb Chops
Rosemary and mint for marinade
2 Carrots finely chopped
2 Potatoes finely chopped
3 tablespoons of olive oil
Rice to serve. Hubby used the quick microwave rice that takes 9o seconds to cook. You can make your own or do the quick way like we did. (the actual recipe suggested mash potato but since we added potato to the vegetables we decided to use rice instead)
Lamb Chops and Vegetables cooked in the Philips Airfryer XXL.
Preparation time is roughly about 3 and half hours. This is taking into account the 3 hours time for the lamb chops to marinade and prep time for the vegetables. Cooking time is about 8 mins. 2 mins to sear the chops and then 6 more minutes to cook the vegetables with the chops. Method:
Marinade chops with mint and rosemary for 3 hours. You can cut the mint and rosemary into fine pieces or zap it as a paste in a mixer.
Once the meat is fully marinated then you can get ready to organise the other ingredients.
Cut up the carrot and potatoes into fine cubes. Note: You can use different vegetables if you like, it is up to you.
Soak the carrot and potatoes in water for 20 minutes. Drain thoroughly before adding to the airfryer pan.
Add the oil to the airfryer pan and move around to coat the bottom of the pan. This way it will allow your chops to not stick.
Heat the airfryer to 200 degrees Celsius.
Put the lamb chops in the air fryer to sear. This is only for 2 minutes.
Take out the lamb chops and set aside for a second.
Put in the vegetables on the bottom of the airfryer pan, then add the lamb chops on top of the vegetables.
Cook again at 200 degrees Celcius for another 6 minutes.
Now it is cooked you can make the rice. If you are using the quick and easy method of microwave rice it will only take you 9o seconds. We used Sunrice’s Rice & Quinoa
Now all done, you can enjoy your yummy meal.
Recipes for the Philips Airfyer XXL
Download the app and get more recipes. Available for at the App storeand on Google Play.
Stay current with all the things that are happening on Mummy to Twins Plus One? Don’t miss a thing by signing up to my newsletter. This newsletter will list all giveaways and fabulous things that are happening.
From the moment you realise you are going to be a mum until your child is getting dressed all by themselves,Australian bananas are the ideal addition to both your diets. Accredited Practising Dietitian, Glenn Cardwell provides 20 reasons why:
Cavendish Bananas
Pregnant & New Mums
Pregnancy is the time to pamper your body and understand the impact of your eating – especially since you are dining for two. One way to give your diet a pinch of powerful production is to add nature’s non-stop energy snack, bananas.
Circular Flour-less White Chocolate Cake with Orange Blossom and Banana
Bananas are excellent when you are expecting because they not only contain essential nutrients for the healthy growth of your bundle of joy, but they are also good for managing morning sickness and constipation that sometimes come with having a baby on board.
Relieving Your Heaving
Thankfully, morning sickness usually only lasts the first trimester but that doesn’t make it fun (however if you are like me pregnancy makes you sick all the time. Bananas have been helping me feel better for breakfast now that I’m in my 3rd trimester.) Eating dry crackers, toast or a piece of fruit like a banana in the morning before you get out of bed, and having small snacks frequently through the day can help as it keeps the stomach from being empty, which can make you feel unwell. Avoiding spicy and fatty foods can sometimes help ease nausea as well.
Reduce Constipation
As the muscles in the intestine lose some of their tone during pregnancy, foods pass more slowly through the gut. The pressure of the baby on the mother’s intestines can also slow down the passage of food and waste, resulting in constipation. The solution is copious amounts of fibre, which bananas provide aplenty, fluids and physical activity. Although the banana is an obvious choice to boost your fibre intake, other fruits, wholegrain breads and cereals and legumes are good options.
Energy to Burn
Bananas are an excellent source of carbohydrate energy in the form of natural sugars and starch. It’s no wonder they call it nature’s non-stop energy snack.
Protect Against Spinal Cord Defects
Folate is vital in the development of a baby’s spinal cord in the womb. It is so critical that the vitamin is recommended to women considering pregnancy. An overwhelming body of evidence has linked folate deficiency in early pregnancy to increased risk of neural tube defects, most commonly known as spina bifida, in infants. One banana will provide about 10 per cent of your folate needs each day.
Form Strong Gums
Extra Ascorbic acid (vitamin C) is required for forming new blood vessels, skin, gums, and other tissues, and even bones. One or two bananas each day will provide valuable vitamin C, as will other fruit, fruit juice and salad vegetables.
Banana and Coconut Milk Pops
Absorb Your Iron
In order for a healthy amount of oxygen to reach your baby via the placenta, your body (and your blood) needs about 50 per cent more iron than usual. Although a banana provides only a little iron, its vitamin C greatly helps with iron absorption from other foods. Iron supplements (usually with folate) are commonly recommended during pregnancy.
Strengthen Bones and Teeth
Calcium is required for strong bones and teeth, and in nerve and muscle growth, both for mum and baby. An extra 300mg of calcium is required for pregnant teenagers as they are still growing as well as nourishing the baby. The perfect way to bump up calcium intake is to regularly drink smoothies – simply blend a banana with a cup of high calcium milk.
Help Babies Grow
Extra protein is needed during pregnancy and breastfeeding to support the growth of the baby, and the production of breast milk. This is easily achieved by adding a delicious banana smoothie (a medium banana and 200mL of milk) to your daily diet.
Boost Your B6
Uniquely, bananas are one of the richest fruit sources for vitamin B6. This powerful vitamin is important for cardiovascular, digestive, immune, muscular, and nervous system function. New or expecting mothers’ daily need for it increases by almost 50 per cent, making bananas a great solution.
Square Flour-less White Chocolate Slice with Orange Blossom and Banana
Baby’s First Food
After six months, your baby’s exclusive exposure to the bottle or the boob is coming to an end. Their digestive system is now ready for solid food. Here are a few reasons why Australian Bananas make the ideal first food:
Essential Nutrients
Bananas are soft, easy for an infant to tackle, and rich with essential nutrients, including vitamin B6, folate, vitamin C, magnesium, potassium, and natural sugars for energy.
Half a medium banana will give an infant:
Folate: 33 per cent of their daily needs
Magnesium: 25 per cent of their daily needs
Vitamin B6: 50 per cent of their daily needs
Familiar Consistency
Mash a banana with breast milk or formula when introducing solids. It is more likely to be accepted quickly as a new food.
Made For Tiny Hands
The banana is the ideal finger food. It can be nibbled, chewed, sucked and squished. Give your child a small amount at a time.
LadyFinger Bananas
Easing Teething
During teething, a cool or frozen banana can help relieve the pain of a tooth coming through.
Nature’s Long-Lasting Energy Snack For Toddlers
Australian bananas make the ideal snack for toddlers. Whether they are just starting to walk or speaking in sentences, children at this age need one fruit serve each day. This might be a medium banana, or half a banana and half of another fruit. While bananas are very popular with young children, it is also important to introduce them to other fruits, especially once they start getting teeth towards the end of their first year of life.
Great Source of Carbohydrates for Energy
To fuel the activity of a toddler, they need carbohydrates at each meal. Bananas are an excellent source of the nutrient in the form of natural sugars and starch.
Protein for Growth
Normal growth needs protein to help produce new cells. A small banana smoothie (150 mL milk and a half banana) as a snack or meal is an excellent source of both protein and calcium.
Vitamin B6 for Blood Health
This vitamin is needed for making red blood cells, and carrying nerve impulses. A small banana will provide about one third of their B6 needs for the day.
Banana Guacamole for Kids
Folate for Growth and Brain Health
The B vitamin folate is needed for proper growth and development. Half a banana will give a toddler about 15 per cent of their folate needs each day.
Fibre for Digestive Health
Bananas are a great-tasting source of fibre, so even a small serving a day for a young child will help keep them regular.
Convenience
Toddlers only want to eat when they are hungry, and they may not want to finish everything on their plate, making snacks like bananas so convenient. You can simply cut them in two and save half in the refrigerator in plastic wrap for later.
Glenn Cardwell is an Accredited Practising Dietitian with 35 years in clinical and public health nutrition, including 10 years as consultant dietitian to the National Heart Foundation, five years at the Children’s Hospital in Sydney, and was a major player in establishing the WA School Canteen Association in 1994.
Mission: To turn store-bought sponge cakes into a stunning wedding centrepiece.
Challenge accepted!
Armed with creativity, a vision, and a few store-bought sponge cakes from Woolworths, I ventured into the world of cakeovers to craft a delightful masterpiece fit for a dreamy wedding. Plus, with the help of gorgeous fresh flowers from Fine Flowers in Katoomba, the transformation was truly enchanting.
What is a “cakeover”?
A “cakeover” is a playful term used to describe the process of transforming an existing or store-bought cake into a more elaborate or personalized creation through decoration, embellishments, or alterations. Think of it as a cake makeover.
It involves taking a pre-made or basic cake and enhancing its appearance or flavour to suit a specific occasion or personal preferences better.
Cakeovers are often chosen for various reasons, such as time constraints, budget considerations, or simply to showcase creativity by customising a store-bought cake to suit a particular celebration, whether it’s a wedding, birthday, anniversary, or any other special occasion.
The Quest for Cake Perfection
Step 1: Cake Acquisition A trip to my local Woolworths store presented an array of sponge cake options. Opting for simplicity, I chose plain sponge cakes – the perfect blank canvas for my cakeover project.
Step 2: Visionary Designs Inspiration struck as I envisioned a multi-tiered cake exuding elegance. With a touch of whimsy in mind, fresh flowers were to be the pièce de résistance. The flowers allowed for a touch of colour and made the cake look so pretty.
Step 3: Assembly Time Stacking the sponge cakes, I sandwiched them with layers of luscious cream and fresh Panama passionfruit from Todarello’s Katoomba Village Fruit Market. The passionfruit gave a great flavour and added a summer feel to the wedding cake.
Passionfruit added to the whipped creamStarting to layer the cakes with the cream between each layerThe whipped cream with passionfruit looks so deliciousCut Panama Passionfruit ready for the whipped creamAll the Panama Passionfruit at Todarello’s Katoomba Village Fruit Market
Creating the white icing
Mix the below ingredients in a bowl. You can mix with a fork or a mixer to ensure you get fluffy icing.
2 cups of icing sugar
2 egg whites
A few drops of lemon juice
A teaspoon of vanilla essence
Once all cakes are staked then ice all the cake as smoothly as you can. Use a scraper to have the icing on the cake look smooth and if you have parts of the sponge cake showing that is fine, this will allow you to have the naked cake look. If you don’t want the naked cake look make sure to cover the cake with the white icing and smooth it out with the scraper. If you want a wavy pattern, you can have a scraper that will do that too.
The scrapers I used for my cakeover wedding cake.
Step 4: The Flourishing Finish Here’s where the magic truly unfolded. Fresh blooms from Fine Flowers in Katoomba were carefully placed atop the cake tiers, infusing vibrant colours and natural beauty into the creation. The flowers were added with paper straws to make sure the stem wasn’t put into the cake. The flowers would then be easily removed to allow the cake to be cut for serving.
I put the flowers on one side of the top of the cake and then on an angle to have some flowers on the bottom of the cake. This allowed more decoration for the top of the cake if needed. I also added a gold “love” cake topper.
Flowers were put in paper straws to then add to the cake
Fine Flowers Katoomba There is always such stunning blooms at Fine Flowers Katoomba
I adore visiting Fine Flowers in Katoomba. They always have stunning flowers that put a smile on my face.
Pretty Teasel Seed headsLove the purple gerbrasStunning white chrysanthemums and rosesCarnations look fantastic and the purple are my favourite!I love the blue irisAll the different flowers at Fine Flowers Katoomba
The Splendor of Cakeovers
Personal Touches Though the base was store-bought, the personalised touch came through the decorations. The flowers’ choice, arrangement, and overall design spoke volumes about the couple’s style and taste.
Budget-Friendly Brilliance By utilising ready-made cakes, the focus shifted from baking stress to creative embellishment, ensuring a stunning outcome without breaking the bank.
Time-Efficient Elegance Crafting a cakeover was a swift process, perfect for those in need of a last-minute, yet spectacular, dessert for a special occasion like a wedding.
Lessons Learned & Tips Shared
Be Resourceful: Embrace store-bought items as a canvas for your creativity. A little transformation can yield exceptional results.
Freshness is Key: Utilise fresh flowers or edible decorations for an instant upgrade to the cake’s aesthetics.
Keep it Simple: Sometimes, simplicity speaks volumes. Focus on a few key elements for a striking overall effect.
Practice Patience: Attention to detail is crucial. Take your time arranging the decorations to achieve the desired look.
Conclusion
With a stroke of creativity and a sprinkle of resourcefulness, a store-bought sponge cake evolved into a mesmerizing wedding centerpiece. The cakeover journey not only showcased the potential of simple elements but also highlighted the beauty of personalisation and affordability in crafting a memorable dessert. So, whether it’s a wedding or any special occasion, remember, a store-bought cake can be the perfect canvas for your cakeover dreams!
So what are the costs associated with creating a cakeover wedding cake?
It might not surprise you that a cakeover will really save you money and still create a yummy and fantastic-looking cake for your special day.
You will see from the table below that creating a wedding cake from an existing cake is the cheaper option.
A simple search online found that if you had a cake that had four tiers and above you would generally pay between $420 – $650.
2 x Woolworths Double Unfilled Sponge 460g
$12.00 ($6 each)
Icing
$2.50
Flowers
$13.00
Cream
$2.80
2 egg whites
$1.25 (based on 6 eggs that cost $3.75)
Panama passionfruit
$4.60 ($2.30 each)
Icing scraper
$4.40 (VIP Spotlight price)
Love cake topper decoration
$11.20 (VIP Spotlight price)
Total:
$51.75
The stunning cakeover wedding cake is decorated and ready for the cake topper
If you already had eggs, icing, the icing scraper or didn’t want the love cake topper decoration (all of this would take $19.35 off the amount above) the new cost of the cake would be: $32.40
As you see, you can make the cake cheaper if you wish.
The flowers make this cake look so pretty
“Pink chrysanthemums represent longevity, attraction, and romance, making them a great choice for a first date or a new love. In general, chrysanthemums are believed to represent happiness, love, longevity, and joy.”
The cakeover wedding cake is all decorated and ready for the big event
Sign up for my newsletter
Stay current with all the things that are happening on Mummy to Twins Plus One. Don’t miss a thing by signing up for my newsletter. This newsletter will list all giveaways and fabulous things that are happening.
This post has affiliate links
This post was originally published on December 19, 2023
All my ingredients for my slow cooked beef and vegetable casserole. I did leave out the capsicum so don't worry about that item.
I love going to the Veggie Patch in Blackheath. As the name suggests they sell fresh produce: fruit and vegetables. However, they also sell pasta, sauces, and all sorts of yummy things.
The Veggie Patch at Blackheath. This greengrocer supplies lovely fresh produce with great service.Pasta, sauces and other yummy things available at the Veggie Patch at Blackheath.
The produce always looks so fresh, the staff that work there are super friendly, and seem to really care about what they are doing. Everyone that works at The Veggie Patch treats the produce with such care.
The wonderful fresh produce from the Veggie Patch at Blackheath. They even have FREE delivery.
Another nice thing that makes me love this fruit and veg shop is that it is a small business and I am helping the local economy by shopping here.
I even purchased my meat from the local butcher (The Blackheath Butchers) and the crusty bread for this meal at the bakery (The Sourdough Bakery in Blackheath) both located in Blackheath, just doors down from the Veggie Patch. Hence, it makes all the shopping so convenient.
Sourdough with sunflower seeds. This bread is so yummy you just want to have more of it.
My slow Cooked Beef & Vegetable Casserole
I don’t have a slow cooker but I have a fancy looking casserole dish (It is a pretty blue and has white spots – very funky and retro looking). Due to not having a slow cooker my casserole dish ends up acting like one instead. I add all the ingredients. Put it in the oven and let it cook for hours. Job done, and a delicious one too!
You might say that this is rather old school regarding slow cooking, and you are probably right.
I have looked at getting the new slow cookers but they are very big and will take up an enormous amount of space that I don’t have in my small kitchen with limited counter tops.
This recipe for slow cooked beef & vegetable casserole is perfect for those cool autumn nights and when it gets even colder in winter. You can have a nice piece of crusty bread with this dish, and a glass of red wine. I’m sure you would not want much more after this. Aside, from having a roaring wood burning fire that is.
So how do you make my scrumptious casserole? Read on to find out how easy this really is.
All my ingredients for my slow cooked beef and vegetable casserole. I forgot the capsicum.
Before you get started, make sure to heat up the oven. Set it to 180 ℃
INGREDIENTS:
2 carrots
A big handful of beans
6-8 small potatoes cut up finely
3-4 pieces of broccolini
1 onion chopped to small or bite sized pieces
6-8 mushrooms roughly chopped up
1 tin of Diced Italian Tomatoes with Basil, garlic, and onion. My tin was from Woolworths but you can have any really, it is up to you and what type of casserole you are making.
Beerenberg Taka Tala Sauce and Marinade – I added the whole jar (This sauce was also purchased at the Blackheath Butchers). It is up to you what sauce you use. You could use a red wine slow roasting casserole or any sauce for slow cooked meals. I know that this sauce is really a marinade but it works very well as a casserole or in a slow cooker.
You can serve this with mash potato or sometimes I like to add carrots or other vegetables to the mash as well. It gives lovely different colours and add to the flavour of the dish
If you decide that mash is not what you would prefer, then you can choose rice or maybe some leafy greens for a nice side to balance the meat and vegetables.
Note: You can substitute any vegetable or ingredient that you would rather. Also, if you have things in the fridge or cupboard that would work, use them, and have a tasty meal with items you already have.
I was going to have mash potato with this meal but decided against it due to adding potatoes to the mixture. Instead I’m having some rice and serving it with some crusty bread.
Another view of all the fabulous fresh vegetables.
METHOD:
Cut up all the vegetables and add the sauce as well as the tomatoes to the casserole dish.
Make sure to mix up all the ingredients before you add the meat.
Once the meat is added stir the ingredients again in the casserole dish.
Add the casserole into the oven and cook for a couple of hours. Check every 30 minutes or so to making sure to stir and to check if all is cooking okay and not sticking to the dish.
Once done the meat should be tender and the vegetables should be soft and melt in your mouth.
If you are having mash potato or other vegetables it is a good idea to get this ready now. You can take out the casserole from the oven as the dish would be extremely hot and keep the dinner warm.
I hope you enjoy my take on a slow cook casserole without using a slow cooker.
All cooked and finished. This slow cooked beef and veggie casserole is ready to eat.
The Veggie Patch have a community spirit and update their window to help local groups and causes.
Sign up for my newsletter
Stay current with all the things that are happening on Mummy to Twins Plus One? Don’t miss a thing by signing up for my newsletter. This newsletter will list all giveaways and fabulous things that are happening.
I melted the butter and golden syrup in the microwave. The recipe wanted you to do it in a saucepan but I think you could do it either way.
Method
Mix the dry ingredients in a bowl, and melt the syrup and butter in a saucepan. Add the baking soda and water to the syrup mix.
Mix the wet and dry ingredients, adding water if necessary.
Separate and roll the mixture into small balls, and flatten them on oven trays.
Bake at 150°C (300°F) for about 20 minutes or until golden brown.
The finished biscuits are quite chewy and crisp, and have a long shelf-life.
Kids helped me make this batch. All ready to go in the oven.
All cooked and ready to eat. They were very yummy! We did not have a huge dinner due to the ANZAC biscuit afternoon tea.
Did you make ANZAC Biscuits? Were they yummy? Did you make heaps? I have a huge box of them and I think they will be treats in lunches for weeks to come.
Let us know your thoughts. Why not continue the discussion on our Facebook and Twitter pages.
Passionfruit is a distinct and flavoursome summer fruit, and one that I really like a lot—yes, I do like a lot of fruit!
Yummy passionfruits – pity you could not smell my kitchen, it was amazing!
I grew up in North Queensland and as a kid, I had bananas, mangos, paw paw, and of course passionfruits growing in my garden, plus loads more. It was a garden filled with everything you needed. I loved the fact that you could just go outside and pick something yummy to eat. It took me a while to adjust that in the city people don’t have the same as I did as a kid. I was spoilt for choice and it did allow me to try more food. I wonder if we had more growing in my garden, would it mean that my kids would eat more food?
Are you the type of person that wonders what else you can do with an ingredient? If so, you are not alone, I do this too. I test things out and give things a go to see if they will work. And my latest project has been seeing what more I can do with passionfruit.
I usually add passionfruit to my breakfast, fruit salad and icing for cakes. However, with the abundance of passionfruit this season I was thinking, “What else could I make with passionfruit that isn’t cake or slices?”
A simple search on the internet for passionfruit recipes produces a myriad of layered cakes and slices, however, I wanted to do something totally different, or at the very least something that not everyone would do.
A bunch of passionfruits, don’t they look delicious
A little bit more about passionfruit
Passionfruit is in season in Australia from Summer to Winter. I had no idea that they are available during winter. Due to our temperate climate in Australia and the fact that most of the passionfruit vines are in a tropical climate passionfruit is available nearly all year round.
There are a few different varieties: Misty Gems, Sweethearts and Panamas.
Passionfruit not only tastes and looks amazing it is also good for you too. This yummy fruit has Vitamin A, Vitamin C, phosphorus, calcium, potassium, magnesium, and folate.
Passionfruit from Todarello’s at Katoomba.
Where do I get my fresh produce?
I shop at Todarello’s at Katoomba, they have the freshest fruit and vegetables and fabulous service to boot.
Todarello’s Fruit Market at Katoomba
So many passionfruitsOranges and apples
Todarello’s has stunning colourful displays and they have so much on offer, not only do they stock all fresh produce, but Todarello’s also have pasta, sauces, snacks, meat, bread and other pantry staples.
Red Ripe TomatoesStunning ripe tomatoes
Capsicums at Toderello’s Fruit Market
If you are also a passionfruit lover, you will love my recipes, you can get more passionfruit into your diet, and of course, have more passion!
I’ve designed the recipes as a progression for a complete dinner – main meal, salad and dessert.
You can download the free eBook with all three passionfruit recipeshere. Once your email has been confirmed your download will happen automatically.
Mango and Passionfruit Stir-Fry Sauce
Stir-fry dinners are simple and quick to make and are also something that can be a great addition to your dinner party. Adding passionfruit to your sauce brings the tangy passionfruit flavour and a bit of summer into your day. I found this recipe from gourmandelle.com/and made it my own.
Ingredients
80ml (⅓ cup) passion fruit juice (Maybe add a cup of passionfruit to make it more passionfruity – that should be a word, don’t you think?)
1 large mango, peeled and cored
1 clove of garlic, peeled
1 tbsp soy sauce
1 tbsp rice vinegar
1 tbsp sesame oil
2 tsp lemon juice
1 tsp honey
Mango and Passionfruit Stir-Fry Sauce ingredients
Method
Place all your ingredients into a blender and process until smooth. Strain the sauce, cover, and set aside. You can use the sauce immediately or store it in the fridge for later.
I used the sauce as a marinade for my chicken stir-fry, the sauce can be used as a dipping sauce too.
The finished Mango and Passionfruit Stir-Fry Sauce
What did I use in the stir-fry?
Chicken
Broccolini
Mushrooms
Spanish onion
Yellow tomatoes
And the main ingredient, my very own Mango and Passionfruit Stir-Fry Sauce (the sauce was tasty, however next time I will add more passionfruit to make it more tangier).
Chicken and vegetable stir-fry with Mango and Passionfruit Stir-Fry Sauce
Passionfruit Salad Dressing
I have never seen a passionfruit salad dressing and wondered why. The passionfruit pulp and tangy taste are perfect for a salad, I looked around and found a recipe and gave it a go. The recipe was inspired by https://curryandvanilla.com/
I made it different from the Curry and Vanilla version by adding more passionfruit pulp with the seeds for texture.
Passionfruit Salad Dressing Ingredients
>
Ingredients
2 cups passionfruit puree
2 tbsp honey/maple syrup
1/2 cup extra virgin olive oil
3 tbsp lemon
½ teaspoon of salt
Crushed black pepper
Salad waiting for the Passionfruit Salad Dressing
Method
Blitz all ingredients in a blender, and strain the mixture to remove seeds and other lumps. I added extra passionfruit pulp (2 extra passionfruit) to the mixture as I wanted the extra passionfruit taste and the crunch of the seeds. You can remove the seeds if you wish and just have the juice and pulp. Once complete add to a container and refrigerate. You can serve it right away or store it for a few weeks in the fridge.
The dressing looked more like ranch dressing but not as thick. It gave a great tang and lift to the salad and was yummy and moreish.
Salad with Passionfruit Salad Dressing
What did I add to the salad?
Red oak lettuce
Green oak lettuce
Mushrooms
Spanish onions
Capsicum
Yellow tomatoes – Sun Delight tomatoes
Broccolini
And of course, my very own passionfruit salad dressing
Salad with Mount Victoria Microgreens
On the stir-fry and salad, I used Mount Victoria Microgreens. The microgreens are grown in the Blue Mountains and are fresh and so tasty. If you want to add some extra taste and be healthier Mount Victoria Microgreens is the way to go. My favourites are the purple radish and the broccoli.
Passionfruit Flummery
My husband is mad about flummery and makes the raspberry flummery based on the Aeroplane Jelly Recipe. I thought why not make a passionfruit flummery instead.
Flummery is a dessert that isn’t a popular menu item, you don’t see flummery anywhere. It has been said that the flummery goes back to the 1500’s in Scotland and the recipes that I remember say they are from the 1950’s or earlier.
Passionfruit Flummery in my op shop glasses
As I was new to flummery from a cooking perspective (I have eaten a few before), I thought it would be fun to give it a go and used the Aeroplane Jelly recipe as well.
Ingredients
1 x 85 g Mango Passionfruit/Mango/Orange Aeroplane Jelly
1 cup (250 mL) boiling water
1 x 375 mL evaporated milk, chilled
Note: I bought two packs of Mango Passionfruit Lite Aeroplane Jelly, however, each pack only has about 20g, so I used all 4 packs for my flummery. Next time I will use an orange or mango aeroplane jelly pack that has the exact 85g.
Passionfruit Flummery with oodles of fresh passionfruit
Method
Mix Aeroplane Jelly crystals and boiling water in a medium bowl. Stir until dissolved. Cover and refrigerate until the consistency of a thick syrup (Approximately 1-2 hours).
Make sure that you keep an eye on the jelly as you don’t want to solid before you mix it with the evaporated milk.
Using an electric mixer, beat evaporated milk with slightly set jelly on high speed for approximately 5 minutes or until doubled in volume. Should be thick and glossy.
Spoon into serving bowls, cover and refrigerate for a further 2 hours or until set firm. Serve with yoghurt, ice cream and fresh passionfruit.
The glasses that I used were purchased from the local op shop. I just loved the blue stems with the square stand. I managed to acquire three Bombay Sapphire Gin glasses that were just perfect for a dessert.
Super yummy looking Passionfruit Flummery
POST FEAST REVIEW
Mango and Passionfruit Stir Fry Sauce This was a simple recipe to make and tasted nice with the chicken and vegetables. I did think that the mango was a bit overpowering and to balance this out I would add more passionfruit next time. Even though I thought it needed more passionfruit it was delicious and both bowls were finished in record time.
Passionfruit Salad Dressing Another simple recipe that was very tasty and lifted a simple salad to new heights. As mentioned in the recipe I added extra passionfruit afterwards as it needed that extra flavour. It was a huge hit with my dinner guests, and I think that having some in the fridge always is a must!
Passionfruit Flummery I had never made flummery before and was surprised at the reaction to the near jelly and evaporated milk.It doubles in size in record time. It tasted amazing with the fresh passionfruit over the fluffy dessert.
Passionfruit ready to be cooked
WOULD I MAKE THIS AGAIN?
Yes, I would make all three recipes again in a heartbeat. Although next time I would make a few little tweaks:
Mango and Passionfruit Stir-Fry Sauce I would add more passionfruit and see if I could make it a little thicker
Passionfruit Salad Dressing I added more passionfruit to the end mixture and believe that it could be tangier but that could be my preference. The version I created was very tasty and was a huge hit.
Passionfruit Flummery This an amazing light and delicious dessert. The one change I would make is to have the flummery in smaller cups to serve.
I hope you enjoy these passionfruit recipes.
The passionfruit was fresh and tasty.
Sign up for my newsletter
Don’t miss a thing by signing up for my newsletter. This newsletter will list all giveaways and fabulous things that are happening. Stay current with all the things that are happening on Mummy to Twins Plus One.
Have you been drooling and dreaming over a chocolate cake?
How about a chocolate cake that has dark chocolate icing?
Well, I have the cake for you… and it will definitely give you your chocolate fix. Plus there is afree printable recipe card to download.
Ingredients
1 vanilla cake mix
1 chocolate cake mix
4 eggs (2 eggs per cake mix)
2 tablespoons of soft butter or oil for the cake ( 1 tablespoon per cake mix)
160ml of milk per cake mix (so times 2)
Whipping cream
Dark chocolate for the decorations
6 teaspoons of dark chocolate cocoa for the icing
Soft icing sugar – I used half a small bag of CSR Soft Sugar Icing Mixture
Make sure that the oven is set to 180°C or 356°F
The chocolate cake mixtureDark chocolate melting in the saucepan to use for decorating
Method
Oil or add butter to the cake pans
Mix the vanilla cake mix
Mix the chocolate cake mix
Half the cake mixtures and put a bit in each pan to create the marble effect
Cook the cakes for around 30 mins or until brown. If you put in a knife and it comes out clean it is done.
Melt the chocolate and pour the melted chocolate on a tray with baking paper. Add the tray to the fridge to set the chocolate.
Add the icing sugar, 6 teaspoons of dark chocolate cocoa. Add a little water or lemon or apple juice to make the icing mix well.
To make the cheats whipped cream simply add the cream to a blender and choose the chop option. Continue until it looks thick. It will take a couple of minutes, you will be suprised at how quick it is, oh and how simple it is too.
When cakes are cooked and cooled add the whipped cream to the middle of the cake, add the top layer of cake.
Cover the cake with the dark chocolate icing
Break up the chocolate and make sure that it is in different sizes and shapes. Stick it to the top and side of the cake.
Now eat your very chocolatey marble cake.
The two marble cakes are ready to ice and decorateSuper dark chocolate icingLooking so chocolatey and delicious
Download the FREE Marble Chocolate Cake Recipe Card
Cut up and ready to eat, don’t you think it looks yummy!
Make sure to download the printable recipe card to make this super yummy very chocolatey cake.
Post Feast Review
I found this cake very easy to make and all elements came together really well. I did cheat a bit with packet cake mixes but when are a busy mummy this does help you out.
One element that I didn’t get 100% right was the whipped cream in the middle of the cake, I added some cream to the top of the cake but should have kept it all for the middle of the cake. After adding the very dark chocolate icing it did add to the marble effect of the cake.
Having the cream helped with the double layer and allowed a different texture and taste with the bitterness of the dark chocolate.
The addition of the broken dark chocolate shards really topped off the cake visually and also from a dark chocolate lover was a fabulous addition (and between hubby and kids the chocolate on top didn’t last long)
Will I make it again?
Yes, this is one cake that I would make again no questions asked. I would change it up a little bit and maybe add raspberries to the middle of the cake or possibly blueberries.
Sign up for my newsletter
Stay current with all the things that are happening on Mummy to Twins Plus One. Don’t miss a thing by signing up for my newsletter. This newsletter will list all giveaways and fabulous things that are happening.
This post has Affiliate Links
This post was originally published on August 26, 2021
I hope you all have a prosperous, healthy and happy new year.
What Chinese animal are you?
I for one am an Ox, hubby is a Monkey, my girls are Rats and my little boy is a Goat/Sheep.
Would you like to find out what Chinese horoscope you are?Chinese Astrology Online has some great horoscopes and information.
Since it is Chinese New Year what better way to celebrate than dumplings!
Have you thought of making your very own? It is easy but time-consuming so don’t think it will be quick to organise. Making the dough, and getting the stuffing is easy, it just takes ages to put it all together. It is worth the effort as homemade dumplings are tasty and made just as you like them.
I was so happy to sit down and drink after I finished. I then left the steaming and organising to hubby as I had enough and was ready to eat my wonderful colourful creations.
Colourful dumplings waiting to be cooked
Ingredients to make the wrapper:
3 cups of plain flour
1 teaspoon of oil
2-3 cups of water. 1 cup hot and the others lukewarm. If you wish to add colour to the dough make the water be carrot juice or beetroot juice. I made the dough and separated it into 3 lots, so to have different colours. In hindsight, I should have done smaller batches of the dough and made the colour from scratch while making the dough. Doing it the long way round meant having to add more flour and most likely weaker colours. My dough from the carrot juice was more yellow and not orange, and the beetroot one was more of a pink, not a deep reddish colour.
My different coloured dough for the wrappers. Beetroot on left, Carrot in middle and Plain on right
Ingredients for the stuffing of the dumpling:
Chicken Mince if you would like them to be meat-based, if not just add vegetables.
1 Carrot & 1 cucumber grated or finely chopped. I chose to grate them as it gives a finer consistency and allows them to fit better in the wrapper.
Finely sliced shallots
Some coriander, just a sprinkling to give a bit of flavour
Soy Sauce
Chilli flakes
A little bit of cornflour to hold the mixture together. Say a spoonful or so. Mix it and see if it needs a bit more.
If you fancy other things to add to the mixture give it a go. You can be creative as you like and if you have certain things in the fridge use them and see what you can create.
Sauce
Soy Sauce
Dumpling Sauce
Rice wine vinegar
Chilli flakes or fresh-cut chillies
Method
Make the dough, then get the stuffing organised. Make sure to have a cool tea towel over the dough so it does not dry out. Once ready, section off parts of the dough and create little pancakes ready for the stuffing to sit into. See the image below.
Adding the stuffing to the wrapper
Once you have the right amount on the wrapper, pull the end up and tweak it so it becomes a little parcel. I am not the best at doing this and my dumplings are not all the same size as you are meant to do. Although it did not cause a problem. The only thing that can go wrong is that ingredients might not cook and it could be too doughy due to it being too big. So be careful.
Once all done I lined them up on greaseproof paper on a tray to make life easier. Once all were complete they were then transferred to the steaming pots.
Waiting to be cooked. I’m super hungry now after making them.
All cooked and ready to eat.
I hope you enjoy your Chinese New Year meals and maybe this has inspired you to cook your own dumplings. Enjoy!
For your Chinese New Year Celebration you can also make the following:
Do you make something special for Australia Day? What is it you like to create to celebrate? Or do you just have a BBQ and some cold drinks with mates and that is your celebration?
This year I decided to make Chocolate Crackles with the twins. I used the recipe from the Rice Bubble box and it brings back memories of making them with my mum.
The ingredients to make chocolate crackles, but I was missing one ingredient. The icing sugar. I ended up using caster sugar and put it in a pestle and mortar to get the sugar finer. I only had icing mixture not the sugar so this was the best option.
The girls were super excited to help and they did a great job. I had them on the kitchen counter so that they could be near the bowls and help out easily.
The ingredients you need:
4 cups Kellogg’s® Rice Bubbles®
1 cup icing sugar
1 cup desiccated coconut
3 Tbsp cocoa
250g copha®*, chopped
Happy to be making chocolate crackles with mummy and sister.
Step 1
In a large bowl mix all the dry ingredients: rice bubbles, icing sugar, coconut and the cocoa. Note: If you use organic cocoa from the health food shop the crackles do not work out well. I tried it for the kids sixth birthday party and they did not set properly and did not taste the same. I used Cadbury’s Cocoa this time and they worked out the way they should. I am not sure why this would create such a difference but thought it best to point it out.
Adding the rice bubbles
As mentioned I stuffed up and did not have icing sugar. I thought I did! Yes silly I should have checked the pantry better, but it all got fixed. I used caster sugar but had to put it in a pestle and mortar to get the sugar to a finer and softer consistency. It worked a treat but took a bit of time to get it done.
Step 2
Melt the copha. I did not chop it up, although the instructions say to. I put mine in a bowl and the microwave melted it for me. You can chop it up and put it in a saucepan and melt it that way. Either way is fine. It took about 2 and half minutes to get it all melted. Could be a little more depending on how your microwave works.
Copha ready to be melted in the microwave
Step 3
Add the melted copha to the dry indgredients and mix well.
Step 4
Spoon the mixture into patty pans, and then put in the fridge to set. It is best to do it overnight to make sure they are hard and fully set.
Ready to go into the fridge to set In the fridge setting. Note the beer and drinks all ready for Australia Day!
Since we are celebrating Australia Day tomorrow I wanted to add the Australian Flag to the chocolate crackles. Note: Adding the Australian Flag after the crackles have set is harder than you think.
Australian Flags for our Chocolate Crackles. I picked these up for $2.00 at the local supermarket.
And now for the finished product!
My finished chocolate crackles are all ready for Australia Day. Yum!
Have a great Australia Day and long weekend. Hope you are having a nice relaxing time. Enjoy your chocolate crackles if you make some and your time with your mates and family.
Note: This post was posted originally on January 25th 2015, and it was when the twins were much younger.
I had such lovely Valencia oranges from Todarello’s Katoomba Village Fruit Marketand thought why not try making orange syrup? How about making it even more orangey, so that each bite just screams summer oranges, even the smell instantly makes you know that it is orange.
Looking online for recipes for orange syrup, all the recipes tell you to use the juice and not pulp. Why not use the pulp? Why not use the super fresh orange puree to ensure your orange syrup is like eating a fresh orange?
Wouldn’t this be AMAZING to have a syrup that just screams tangy fresh tasty juicy oranges?
So how did I make this extremely yummy orange syrup?
This orange syrup can be used for cocktails, refreshing drinks (plain water and sparkling), syrup over ice cream, and also sauce to bind cakes together for a creative cake creation.
INGREDIENTS
2 Valencia Oranges = 1 cup of orange puree
1 cup of water
1 and a half cups of sugar
Orange skin (Use the skin of the 2 Valencia oranges so that it infuses the orange flavour).
All the oranges before they went into the blender
METHOD
This recipe takes around 20 minutes to make. Not long to then enjoy your orange syrup.
Step 1: Cut up the 2 Valencia oranges, remove the skin and just leave the flesh of the orange. Put all the orange flesh into a blender and make sure it is thoroughly pureed. Pour out into a measuring cup, you should have 1 cup.
Step 2: Put the orange puree, water, and sugar into a saucepan. Melt the sugar and wait till the mixture thickens up a little. Depending on the amount of sugar added depends on how thick the syrup gets, if you wish to have a thicker syrup you can add more sugar. (I put my syrup in the fridge and it thickened up a bit more after a few days.)
Step 3: Add the orange rind to the mixture so that the orange flavour gets stronger. I cut up all the orange skin and added it all.
Step 4: Once cooked to your desired consistency strain the mixture and once cool put it in a jar/jug and then in the fridge. The syrup will keep in the fridge for around a month.
I added orange juice and orange to ice cubes – It made my orange syrup gin drink taste amazing!
POST FEAST REVIEW
I had no idea that fruit syrup was really easy to make. The syrup had a nice caramel taste when it was added to vanilla ice cream. I added orange zest for taste and decoration, the zest added bursts of flavour.
Having the syrup in the fridge for a few days allowed it to thicken up a little more. It was a better consistency after about 3 days in the fridge.
There is an amazing amount of uses for orange syrup, drinks, cakes, ice cream, and desserts.
Now that I know how easy it is to make, I will make different types of syrup for desserts. How about raspberry, blueberry or mandarin syrup? I am now thinking about another ingredient could be syrup.
So refreshing with fresh orange syrupYou can add a little or a lot depending on your taste
WOULD I MAKE THIS AGAIN?
Yes, I would make this again, however, I would make some changes when making it next. I would add more orange and up the sugar a bit. Creating a thicker syrup that is more like an orange concentrate from fresh oranges. Adding the zest to the syrup would be a great addition as well, this way there is a different texture for taste and it will look amazing too.
SIGN UP FOR MY NEWSLETTER
Don’t miss a thing by signing up for my newsletter. The newsletter will list all giveaways and fabulous things that are happening. Stay current with all the things that are happening on Mummy to Twins Plus One.
If you are like me you sometimes run out of things for dinners. Yes sad but true. This tasty recipe that I’m about to share only uses some items from the pantry, fridge and takes no time at all to cook.
It is easy, quick to make and of course super yummy, that said you need to like chilli’s. I do love chilli so therefore this is not an issue. If you don’t you can substitute another type of flavour to not have it as spicy. Remember this recipe is flexible so you can amend it to suit your tastes.
Ingredients
2 x John West Tuna Tempters Chilli 95g. I was only cooking for myself so 2 cans were ample, however if you needed more spice or sauce you might find you need to add more cans, say 3 or 4.
Bok Choy
Capcisum
Onion
Udon Noodles
Carrot
Champignons/mushrooms (As I had the champignons in the pantry these were used. If I had fresh mushrooms I would have used them.)
Sesame Seeds for sprinkling on the noodles if you wish or you can crush up some almonds and use them for some extra crunch.
All the vegetables cut and ready to be added to the meal.
Method
I got all my vegetables chopped and ready, all aside from the onion were put in a bowl.
Put on a pot of water to boil. Once boiling add the udon noodles. These should cook for about 5 mins. I like mine soft so I might cook mine a little longer. If they are nearly to the softness I like I take the pot off the heat and leave them in the hot water until I’m ready to serve. This way the noodles are hot and just the way I like them.
The udon noodles cooking away.
When a pan was heated up with some olive oil I cooked the onion until it was translucent.
Cooking the onions.
Now add the other vegetables to the pan and have them simmer a while until they are partly cooked. I like to have the bok choy mix around in the olive oil to add a bit of flavour. I leave it for about 5 mins or so.
It is now time to add the chill tuna. To make the most out the sauce you need to make sure you get everything out of the tin. I like to add a little water that allows tuna that has stuck to the bottom and edges to dislodge and the water adds to the sauce. This is when you will know if you need an extra tin or so for the sauce. It does depend on how many will be eating but you can adjust this so don’t worry.
I’ve added the tuna and now getting the rest out of the tin by adding some water. The addition of water also helps with making more of the sauce.
Remove the noodles from the water if they are still there. Split up the noodles into warm bowls.
If you would like sesame seeds/almonds sprinkled over the noodles now is the time to do this. You also could add a little soy sauce to the noodles for flavour, but not too much or it gets too salty.
Your sauce is now ready with the vegetables. Add it to the bowl with the noodles.
Your meal is ready and you can now eat! If you wish you can also to garnish it with parsley/coriander.
Your quick and easy dinner is now ready to eat. Chilli Tuna Veggie Noodles you will find so good that you will add it to your meal plans.
The show ‘Only Murders in the Building’ reminds me of Alfred Hitchcock’s ‘Rear Window’. The show looks into other people’s apartments and bit by bit you learn more about their lives. As a viewer, you get involved, invested, and need to find out what will happen next. The art deco animation for the intro titles is also reminiscent of old films, well I think it is.
Learn about the Art of the Arconia
DID YOU KNOW Sesason 1 of ‘Only Murders in the Building’ was the most watched show on Hulu
I just love Selena Gomez’s outfit from the first season of Only Murders in the Building
What are Only Murders in the Building about?
“Only Murders in the Building is an American mystery-comedy streaming television series created by Steve Martin and John Hoffman. The ten-episode first season premiered on Hulu on August 31, 2021. The plot follows three strangers played by Steve Martin, Martin Short, and Selena Gomez, who share an obsession with a true-crime podcast. After a suspicious death in their affluent Upper West Side apartment building, the Arconia, the three neighbors decide to start their own podcast about their investigation of the death, which the police ruled a suicide.” Wikipedia.
I loved the show and have been waiting eagerly for season 2. It is so cleverly written, acted, and a well-cast show. A joy to watch!
One of the Hardy Boy books from Tim Kono’s apartment
Season 2 of Only Murders in the Building starts 28th of June 2022
Steve Martin as Charles-Haden Savage in Season 2. Charles is shocked at being accused of murder.Martin Short as Oliver Putnam in season 2 and not happy about being accused of murder.Selena Gomez as Mabel Mora having her photo taken at the police station in season 2. It is not looking good for Mabel having blood over her shirt.
Oliver, who is played by Martin Short exclusively eats dips. “I haven’t had a real entree in years,” he proudly shares. “It’s all containers and fingers.”
While Oliver (Martin Short), Mabel (Selena Gomez), and Charles (Steve Martin) attended the body corporate meeting to discuss the recent murder and there were a bunch of dips for the residents. Oliver decided to take them all as he declared it a meal and why waste it!
Celebrate Season 2 of Only Murders in the Buildingwhile eating dip!
Spicy Sesame Guacamole ready to eat
Spicy Sesame Guacamole
INGREDIENTS
4 medium ripe avocados, peeled and pitted (or 1 pack of frozen avocado pieces thawed)
2 limes juiced
2- 4 green onions, coarsely chopped, plus extra for garnish (if you have fewer avocados use less onion.
4 tbsp. chopped coriander
2 tsp. chilli garlic paste
1 tsp. soy sauce
1/2 tsp. salt
1/4 tsp. sesame seeds
Toasted sesame seeds on the Spicy Sesame Guacamole
DIRECTIONS
1. In a large bowl, mash avocados and lime juice with a fork or potato masher to desired consistency, leaving some chunks. Stir in green onions, coriander, chilli garlic paste, soy sauce, and salt.
2. Garnish with sesame seeds and serve immediately with tortilla chips or crackers. You can make it ahead. Make sure to place plastic wrap directly on top of the guacamole to prevent browning and refrigerate.
Beetroot Houmous
INGREDIENTS
1 cup Chickpeas cooked
1 medium Beetroot
2 cloves of Garlic
1 tbsp Lemon juice 1/2 tsp Cumin Powder
1/2 tsp Salt
Water to thin out
Cutting up the beetroot
INSTRUCTIONS
Step 1: Cut up beetroot and cook in a pot with a little water over medium heat. Cook till soft. Cool down the beetroot before starting step 2.
Step 2: In a food processor, place chickpeas and cooked beetroot and process for one minute or until smooth. Add garlic, lemon juice, cumin powder, and salt and process by adding water to thin the mixture out.
Step 3: Refrigerate or enjoy immediately. The dip should last for a week in an airtight container.
Beetroot Houmous
Roasted Eggplant Dip
INGREDIENTS
1 large eggplant
1 lemon, juiced
3 garlic cloves
1/2 Spanish onion, quartered
1/2 cup parsley
4 slices of bread
Olive oil
Salt and pepper to season
INSTRUCTIONS
Step 1: Preheat the oven to 180°C. Step 2: Cut the eggplant in half and place it on a baking tray, cut side up. Bake in the oven until the eggplant is brown and soft. Step 3: Remove from the oven and allow to cool for five minutes before peeling back the skin of the eggplant from the soft flesh. (Don’t wait too long to peel off the skin or else it will be stuck). Step 4: Purée all ingredients in a food processor for 60 seconds before drizzling in the olive oil. You’ll need to add the olive oil slowly and add just enough to bring all the ingredients together into a thick paste. Season with salt and pepper and blitz again. Step 5: Serve with bread or crackers.
Eggplant cut and ready to cook
Roasted Pumpkin & Cumin Houmous
INGREDIENTS
500g pumpkin, peeled, seeded, cut into 3cm pieces 400g can chickpeas, rinsed, drained 1 garlic clove, crushed 1 tbsp ground cumin 2 tbsp fresh lemon juice 80ml (1/3 cup) olive oil Chopped fresh continental parsley, to serve Crackers or bread to serve
INSTRUCTIONS
Step 1: Preheat the oven to 200°C. Line a baking tray with non-stick baking paper. Bake for around 30-35 minutes, until the pumpkin is soft. Set aside for around 20 minutes to cool down before you start the next step. Step 2: Process the pumpkin, chickpeas, garlic and cumin in a food processor until almost smooth. Add the lemon juice and process until well combined. Step 3: With the motor running, add the oil in a thin steady stream until smooth. Once done, transfer the hummus to a bowl. Sprinkle with parsley and serve with crackers or bread.
Enjoy the dips while you watch the new season of Only Murders in the Building.
Would you like a super easy meat pie for your party? How about dinner or lunch? Or your Australia Day celebration?
Well, I have an easy recipe for you and it is very yummy too!
Preheat the oven: Heat the oven to 180°C or 356 °F
INGREDIENTS
500 grams of beef mince (You can choose chicken, pork or turkey if you wish)
Frozen puff pastry sheets
2 carrots grated
2 big cups of chopped mushrooms
Soy Sauce – I added a sprinkle when cooking the mince
2 spanish onions – finely cut
1 brown onion – finely cut
1 pack of Masterfoods Spicy Chilli Con Carne (this is used as sauce rather than a gravy)
METHOD
Take out 4 sheets of pastry to defrost
Cut up the onions and add them to the fry pan
Add the mince
Add the soy sauce
Add the grated carrot
Add the Spicy Chilli Con Carne sauce mix and then add the pouch with water to get all the sauce out and add to the sauce in the fry pan
Cook all ingredients until the water in the sauce has reduced a little but all as you need to have the sauce there to add to the mixture for the pie
Once all ingredients are cooked for the inside of the pie, turn off the fry pan
I used a muffin and friand tin to put my puff pastry in. I did find that the friand tin did it better. Also you will see that my pastry was not perfect and actually more rustic than I was hoping for.
Cut out a good square of pastry that will match the bottom and sides of the tin. I then pressed the pastry down to the bottom and the sides.
I then filled the pastry pie in the tin with the filling from the fry pan and finished off each individual pie with more pastry. This was measured by seeing if a big glass was a little bit bigger than the top of the pie width for each pie in the tin. I used a big gin glass to cut out a circle to then pinch closed on top of each indivual pie.
Bake for 30 minutes or until the pastry is very golden brown and looking crunchy.
I served the pies with a salad. It was very yummy and filling.
POST FEAST REVIEW
I thought that making pies would be easy and I was right. It really isn’t hard. However, I don’t really have a pie tin and made do with using a muffin and friand tin as a substitute. It worked out well with these tins but I did notice that the friand tin worked better.
The pastry was a bit clumsy and rustic but worked on the whole. A few pies had their bottom give out a little when I attempted to remove them from the tin.
I found that the pies were just the right size and a salad or vegetables for dinner. If you do decide to make this you can make a few different pies and then mix and match to have a few different ones on your dinner plate.
The pies were very tasty and the Spicy Chilli Con Carne sauce made it very tasty indeed as well as the chewy and melt in your mouth mushrooms.
I did read a few recipes but made it up as I went along, although this alarmed and annoyed my husband. He thought that I was following a recipe and got quite frustrated to learn I wasn’t. I then pointed out it was an experiment and he wasn’t cooking so it really didn’t matter.
WOULD I MAKE THIS AGAIN?
Yes, I would make this again. I think I need to get proper individual pie tins or make one big pie and have it as a slice of one pie for each person at dinner or lunch. It was rather quick and simple and for the remaining pies, I can have them in the fridge and just heat up for the next meal.
Sign up for my newsletter
Don’t miss a thing by signing up for my newsletter. This newsletter will list all giveaways and fabulous things that are happening. Stay current with all the things that are happening on Mummy to Twins Plus One.
It is funny, has a nice message and is an interesting story of a man who is starting again in a new country.
The show is on Apple TV and is currently in season 2.
On the show, Ted Lasso brings biscuits to his boss to make a good first impression. The boss, Rebecca is taken with the biscuits and has no idea that Ted actually makes them. In other episodes, she calls around bakeries to see if they stock these exact biscuits.
Ingredients
1 and a half cups of flour
Half a cup of almond flour
Half a cup of sugar
1 lemon – juice and rind
220 grams of butter
Half a teaspoon of salt
1 tablespoon of vanilla extract
The ingredients to make Ted Lasso’s Biscuits
Make sure to have your oven on for 180°C or 350°F
Method
Add flour, almond flour and salt into a bowl or food mixer to combine all together
Add the butter and vanilla until it is looking like breadcrumbs
Add the the lemon juice and lemon rind, you might need a little extra flour to make sure it is not that sticky
Butter or oil a square pan and press the mixture down so that is all flat
Bake for around 30-35 minutes or until it is golden brown (so could be less depending on your oven)
I made sure to check in around the 25-30min mark and it did need a little extra as the addition of the lemon juice made the mixture a little bit wetter and dense.
Cool down the pan and then put on a cutting board to cut into fingers
Now the biscuits are ready to serve and enjoy.
If you would like to have a pink biscuit box as I have in my pictures, I downloaded the printable from Salt Harvest Creatives. Just remember to print the page double-sided.
This is me (yes that is my box of biscuits in front of the TV) giving Rebecca my biscuits, I hope she likes them. I think they are very much like Ted’s.
The biscuits are made and now in the pink box
>
Smash Blue Glass Bento Box was perfect for storing the rest of the Ted Lasso Biscuits
The SMASH Glass Bento Box is solid and just the right size for the fridge.They all fit nicely
Post Feast Review
I did think that the biscuits are more like shortbread. I think next time I make these I will use a traditional shortbread recipe and add a few tweaks to see what will work, adding lime, more lemon rind, orange zest, or maybe chocolate drops (dark chocolate of course)
A friend said that he made it before and thought it needed something and that is why he strongly suggested that I add lemon – he did so and thought it made a huge difference. I made this recipe with lemon and haven’t tried it without but as it is basically just a shortbread recipe I can see that it might need something else to make to take it to another level.
I do wonder if there is a way to limit the amount of butter in this recipe…maybe it will take a few experiments to see if adding less still gives you the desired biscuit result.
Would I make this again?
Yes, I would. It was a nice biscuit but I would love to play with different tastes and ingredients and limit the amount of butter as well.
Sign up for my newsletter
Don’t miss a thing by signing up for my newsletter. This newsletter will list all giveaways and fabulous things that are happening. Stay current with all the things that are happening on Mummy to Twins Plus One.